Quantcast
Channel: Morovia Knowledge Base
Viewing all 183 articles
Browse latest View live

How to install an .msi File that requires System Admin Privileges on Windows Vista

$
0
0

How to install an .msi File that requires System Admin Privileges on Windows Vista

Problem

Many software are packaged in .msi format, which is the standard format for Windows Installer Server. Because system resources access are required for software to function, they require system admin privileges during installation.

Windows Vista uses a different security model and runs most program with privileges of a normal user. You must acquire system administrator privileges before installing the software.

Solution

The following procedure outlines how to install a .msi file under Windows Vista.

Unblock the file

Files downloaded from another computer contain extra stream. Windows Vista block these files by default, which prevent it to run. As the first step, you need to Unblock it.

  1. Right click on the file downloaded, and choose Properties...

  2. If you see text This file came from another computer and might be blocked to help protect this computer. on the general tab, click on Unblock.

Install the Program

Locate the Windows Command Prompt shortcut in your Programs menu (typically ProgramsAccessoriesCommand Prompt and right click on it:

After you confirm, the command prompt will appear. CD into the directory that the file is located under, which is usually c:\users\youAccount\Downloads. Type the whole file at the command prompt, and hit Enter.

C:\Users\ACCOUNT\Downloads>Monterey_BarcodeCreator_V3.3.4.10.msi

The installation will run under administrative privilege.

An Alternative Solution

You can turn off user access control (UAC) completely in Windows Vista. Doing so bypasses some of the additional security measures, but you can install programs just by double clicking on the .msi file without hassle.

To turn off UAC, follow the steps below:

  1. Select Control Panel and click on User Accounts.

  2. Click on User Accounts again.

  3. Click on Turn User Account Control on or off

  4. Uncheck Use User Account Control (UAC) to help protect your computer option.

  5. Press OK and restart your computer for the changes to take effect.

Monterey Barcode Creator

If you have installed Monterey Barcode Creator trial (version 3.3 or above), you can turn the version into a full one by entering registration code. Doing so still require administrative privilege, but you can do so by following the steps below.

  1. By default, the installation places a green icon on your desktop. Right click on the green icon and select Run As Administrator.

  2. Select HelpAbout

  3. Click on Register Now button and pop up the registration dialog.

  4. If you saw the error message System Administrator Privier is required, the program does not have admin privilege. Close the program and start again.

  5. Enter your license name and registration code. After confirm, you can close the program. The program is successfully registered.


Developing Local Reporting Application with Barcode Fonts Plugin on Visual Studio 2013 and above

$
0
0

Developing Local Reporting Application with Barcode Fonts Plugin on Visual Studio 2013 and above

Introduction

In this article we'll work through creating a local reports application using Morovia DataMatrix fonts. The tutorial is based on Visual Studio 2013; they should work on higher versions such as Visual Studio 2015. The tutorial assumes that you have Morovia Datamatrix Fonts & Encoder 5 installed on the development machine.

An example project using Northwind Access database is attached in this article.

Creating Reporting Application Skeleton

In Visual Studio, select New Project... from the File menu. Locate template Reports Application under Other Languages/Reporting category. Give a project name and click OK.

Follow the designer wizard to choose the dataset and the fields in the report. After the wizard is completed, you should get a project as below:

Compile the project and run the program. You should be able to run the program without any errors.

Note

If some dataset field names contain spaces or in a form that is not compliant with CLS identifier rules, you will receive Field names must be CLS-compliant identifiers.. You need to change the field names manually in .rdlc file. The designer wizard does not warn on non-compliant field names.

Adding Custom Assembly

Remember that you cannot just format the string encoded with barcode font to produce a barcode. Instead, the data string must be encoded into a form called Barcode String first. The encoder function resides on a DLL written in C++. Unfortunately the report cannot call this DLL directly so we provide a wrapper DLL.

For this tutorial the wrapper DLL is called ReportServicePlugin_DataMatrix5.dll, located under C:\Program Files (x86)\Morovia DataMatrix Fonts & Encoder 5. If you are using a different product, refer to the manual for the name and the location of the wrapper.

Started from Visual Studio 2013 the build engine has changed. Because of this change, you need to copy the DLL to C:\Program Files (x86)\MSBuild\[version]\Bin directory. Replace [version] with the corresponding Visual Studio version, as below:

Product Version
Visual Studio 2013 12.0
Visual Studio 2015 14.0
Visual Studio 2017 15.0

Now add the assembly to the project reference by right clicking on the project and select AddReference. With this step the assembly is copied to output directory every time that the project is built.

Adding Barcode to Report

Click on Report1.rdlc to switch to report design view. Select Report Properties from Report menu. Click on Reference and add the reference to the custom assembly.

Now right click on the header of the last column and insert a column on the right. Right click on the text box just created, and select Expressions. Change its value to:

Morovia.ReportService.DataMatrixV5.DataMatrixEncode(Fields!LastName.Value,-1)

You can use the builtin operators and functions to pass more complicated string to the encoder function.

Now you can build the project. However, when you run the report, you will see #Error in the new column.

Code Changes under .Net Framework 4

The .Net framework changed the security model.

First open App.config, add the following content just before ending configuration.

  <runtime>

    <!-- enables legacy CAS policy for this process -->

    <NetFx40_LegacySecurityPolicy enabled="true" />

  </runtime>

In Form1.cs file, inside Form_Load method, add

#pragma warning disable 618
  this.reportViewer1.LocalReport.AddTrustedCodeModuleInCurrentAppDomain(
   "ReportServicePlugin_DataMatrix5, Version=1.0.4191.23800, Culture=neutral, PublicKeyToken=null");

Note that the parameter must match the custom assembly string. In order for the string to be exact, click on Report Properties/Reference to view the assembly reference string.

Build the project and run again. You should see the barcode string in the new column. Go back to the report designer. Right click on the text box and select Textbox Properties/Font. Change the font MRV DataMatrix5 and font size 6pt. Build the project again.

Sample Project

Download the sample project here.

Online Barcode Generator Service Readme

$
0
0

Online Barcode Generator Service Readme

Introduction

This article explains how the paid user uses online generator web service.

URL format

Request URL should have the following format:

http://www.morovia.com/free-online-barcode-generator/barcode.asp?Key=value&Key=value

For example, such a URL is valid:

http://www.morovia.com/free-online-barcode-generator/barcode.asp?Symbology=0&BarHeight=400&ShowHRText=1&NarrowBarWidth=10&Message=1370938&Rotation=0&UserKey=99000xxx

Parameters

Parameter keys are case incasesentive; however we recommend that they are spelled as they appear in the table below. Default values are shown in bold.

Table 1. Parameter List

Property Data Type Description
Symbology Number Barcode type
Rotation Number Four values are supported: 0 (no rotation), 1 (counterclockwize 90 degrees), 2 (counterclockwize 180 degrees), 3 (counterclockwize 270 degrees)
ShowHRText Boolean 1 (show human readable text), 0 (no human readable text).
Message String The string encoded
NarrowBarWidth Number X dimension, in number of pixels.
BarHeight Number Bar height, in mils (1/1000th inch)
UserKey Number A 10-digit number for authorization key

Table 2. Symbology List

Value Barcode Format
0 Code39
1 Code39-Full-ASCII
2 Code39Mod43
3 Codabar
4 Code93
5 Code128
6 UCC-EAN-128
7 Interleaved-2-of-5
8 UPC-A
9 UPC-E
10 EAN-13
11 EAN-8
12 Bookland
13 Telepen
14 Telepen-Numeric
20 POSTNET
21 PLANET
22 Royal-Mail
30 MSI-Plessey
31 Code25
32 Code11
33 DataBar-14
34 DataBar-Truncated
35 DataBar-Stacked
36 DataBar-Stacked-Omnidirectional
37 DataBar-Limited
38 DataBar-Expanded
40 PDF417
41 DataMatrix
42 MaxiCode

Note: not all features are exposed through the query string. Contact Morovia support if you feel that the current feature set is inadequate.

When UserKey is specified and validated, requests are logged based on the UserKey. You can request a log of requests by writing to support@morovia.com.

Adding DataMatrix Symbols to SQL Server Reporting Service 2010 and Above

$
0
0

Adding DataMatrix Symbols to SQL Server Reporting Service 2010 and Above

Introduction

The manual for DataMatrix Fonts & Encoder 5 includes a chapter on adding datamatrix symbols to SSRS 2008 and prior. The process of adding datamatrix to SSRS 2010 is largely the same, with some differences.

Software Requirements

Adding datamatrix to SSRS reports require install of customer assembly. To develop reports with custom assembly support, you need SQL Server Data Tools (SSDT). The SSDT is included in the SQL Server installation disk, or you can download it free at Microsoft web site by searching SQL Server Data Tools. SSDT is actually a rebranded Visual Studio, withe version correlation as below.

Product Version
SQL Server 2010 Visual Studio 2010
SQL Server 2012 Visual Studio 2013
SQL Server 2014 Visual Studio 2015

The other report designer software, Report Designer does not have the capability to work with custom assembly.

Adding Custom Assembly to Visual Studio

Remember that you cannot just format the string encoded with barcode font to produce a barcode. Instead, the data string must be encoded into a form called Barcode String first. The encoder function resides on a DLL written in C++. Unfortunately the report cannot call this DLL directly so we provide a wrapper DLL.

For this tutorial the wrapper DLL is called ReportServicePlugin_DataMatrix5.dll, located under C:\Program Files (x86)\Morovia DataMatrix Fonts & Encoder 5. If you are using a different product, refer to the manual for the name and the location of the wrapper.

to install the custom assembly, copy the file to C:\Program Files (x86)\Microsoft Visual Studio [version]\Common7\IDE\PrivateAssemblies directory. Replace [version] with the actual Visual Studio version number, for example, 12.0.

Unlike previous versions, the preview action now requires the custom assembly to be defined in the policy file RSPreviewPolicy.conf. If you do not see this file, you probably look into the wrong directory, or you did not install SSDT.

Open RSPreviewPolicy.config file in a text editor (Run as Administrator), add the following content just before two ending CodeGroup tags:

<CodeGroup class="FirstMatchCodeGroup" 
  version="1" 
  PermissionSetName="FullTrust"
  Name="ReportServicePlugin_DataMatrix5.dll" Description="ReportServicePlugin_DataMatrix5.dll">
  <IMembershipCondition class="UrlMembershipCondition" version="1"
Url="C:\Program Files (x86)\Microsoft Visual Studio 12.0\Common7\IDE\PrivateAssemblies\ReportServicePlugin_DataMatrix5.dll" />
</CodeGroup>

Make sure that the file path is correct, and the resulted file is a valid XML file.

Adding Barcode to Report

We recommend that you run SQL Server Data Tools (SSDT) as Administrator. This allows you to deploy the report from SSDT. The Administrator privilege is not required when designing and previewing reports.

Click on Report1.rdlc to switch to report design view. Select Report Properties from Report menu. Click on Reference and add the reference to the custom assembly.

Now right click on the header of the last column and insert a column on the right. Right click on the text box just created, and select Expressions. Change its value to:

Morovia.ReportService.DataMatrixV5.DataMatrixEncode(Fields!LastName.Value,-1)

You can use the builtin operators and functions to pass more complicated string to the encoder function.

Now Click the Preview tab. You should see the datamatrix symbols appearing in the report.

Deploy Report

You can use Deploy menu from SSDT to deploy the report to the server. However, in order for the server to render the report, you need to add the custom assembly to the server and modify policy file rssrvpolicy.config.

  1. Locate the direcotry of Reporting Server. Usually the directory is like C:\Program Files\Microsoft SQL Server\MSRS11.MSSQLSERVER\Reporting Services\ReportServer. This directory should have rssrvpolicy.config file and bin subdirectory.

  2. Add the content below to rssrvpolicy.config file, just before two endinging CodeGrouptags:

    <CodeGroup class="FirstMatchCodeGroup" 
      version="1" 
      PermissionSetName="FullTrust"
      Name="ReportServicePlugin_DataMatrix5.dll" Description="ReportServicePlugin_DataMatrix5.dll">
      <IMembershipCondition class="UrlMembershipCondition" version="1"
    Url="C:\Program Files\Microsoft SQL Server\MSRS11.MSSQLSERVER\Reporting Services\ReportServer\bin\ReportServicePlugin_DataMatrix5.dll" />
    </CodeGroup>

    if the policy file is configured correctly, you should be able to view the report corrrectly from the browser.

PRB: Defect DataMatrix Printed with Crystal Reports RAS Engine

$
0
0

PRB: Defect DataMatrix Printed with Crystal Reports RAS Engine

SYMPTOM

When printed using Crystal Reports RAS engine, some datamatrix barcodes contains defects, which cause the barcode unreadable. This behavior does not appear in print results produced using Crystal Reports Print Engine.

Crytal Reports contains two print engines: Crystal Reports Print Engine (CRPE) and Reporting Application Server (RAS). Although developers may not know it, the two has different implementation. CRPE is the oldest and reliable method that is used in Crystal Reports Designer and Viewer.

The .net code illustrates the use of RAS as print engine:

 String reportPath = @"test.rpt";
  _report.Load(reportPath);
  
  PrinterSettings printer = new PrinterSettings() { PrinterName = @"HPLaserJ"; };
  PrintOutputController rasPrintOutputController;
  rasPrintOutputController = _reportClientDocument.PrintOutputController;
  PrintReportOptions printreportoptions = new PrintReportOptions();
  
  printreportoptions.PrinterName = @"HPLaserJ";
  printreportoptions.NumberOfCopies = 1;
  rasPrintOutputController.PrintReport(printreportoptions);

Figure 1. Defect DataMatrix Barcode

Defect DataMatrix Barcode

CAUSE

The Crytal Reports RAS engine contains bugs in its font render that produces incorrect widths under certain conditions. To work around the issue the character mappings of the font must be changed.

RESOLUTION

Upgrade to DataMatrix Fonts & Encoder 5.2 (released in May 2017) or above . Replace encoder function DataMatrixEncodeSet with DataMatrixEncodeSetRAS in your formula definition, then refresh the report.

Adding Linear Barcodes In Crystal Reports Using UFL

$
0
0

Adding Linear Barcodes In Crystal Reports Using UFL

The Crystal Reports UFL is free to use in conjunction with our barcode fonts. This Crystal Reports UFL is bundled with Fontware products (Windows version only). It is a component of Morovia Font Tools for Linear Barcode Fonts, which can be downloaded and upgraded separately. The Crystal Report UFL DLL provides encoding functions for the following barcode formats: Code 39, UPC-A, UPC-E, EAN-13, EAN-8, Code 93, Code128, EAN-128, Codabar, POSTNET, Royal Mail, and Interleaved 2 of 5. The UFL for two dimensional barcodes are included in 2D Fontware packages.

Prerequisites

  • Crystal Reports 6.0 and above

  • Morovia Linear Barcode Fonts

Crystal Reports UFL (User Function Library) provides a way to expose external functionality to Crystal Reports. Once installed, these functions can be used as if they are native functions. On the other side, the DLL must be installed and registered properly on every computer that your report will run, including computers from which you view the report through a Crystal Reports ActiveX control. Therefore, if the report is going to be distributed to and viewed on multiple computers, a better solution would be to create PDF documents with barcode fonts embedded.

A Tutorial

In the following tutorial we will start with a blank report. In the report we created several database fields. Now we want to add a barcode field which encodes shipping ID. We choose Code128C as the barcode format.

  1. First switch to the design view of the report. This can be done by selecting View | Design or by pressing CTRL+D.

  2. Now choose View | Field Explorer to have Field Explorer appear at the right side of the work space.

  3. We are now ready to add the barcode field. Right click the Formula Fields to have the context menu pop up. Choose New....

  4. Give a name to this new field. In our case we simply call it barcode. You can also use any names compatible with your naming convention.

  5. Click on Use Editor button. The Formula Editor pops up. Find Morovia barcode functions under the Additional Functions | Visual Basic UFLs section. If you can not find such an item, most likely you installed the Font tool without closing Crystal Report. In this case restart Crystal Report and repeat the steps above.

  6. Select the appropriate barcode function (in our case is MoroviaBarcodeCode128C), double click it to make it appear in the bottom panel. Move the cursor between parentheses. Enter the data field you want to encode. In our case, we put {Sheet1_.CustomerID} because that field is what we want to present in barcode form. Note that this field needs to be a text string. You can use Crystal Reports function ToText to convert other format into text string.

  7. Dismiss Formula Editor and return to the Field Explorer dialog.

  8. Drag the new field from Field Explorer to anywhere you want to place in the report.

  9. Right click on this new field to pop up Format Editor, and select Font tab. Use this page to change the font name and size so the barcode created fit the size requirement. In our case, we use MRV Code128CSA and 12 points font size. Click on OK to dismiss the dialog.

  10. Click on the Preview tab, barcodes should appear on th report. We have successfully build a report with barcode in minutes! Note that this tutorial uses the trial version of Code128 Fontware, so the second barcode contains a demo image. This limitation will go away in the full version.

Distributing UFL, Fonts with Your Report Application

Once you finish the report design, you can distribute your report application with Crystal run time files, barcode fonts and the UFL library.

License

You need a developer license to distribute fonts and UFL DLL designed by Morovia Corporation.

File List

There are three runtime files that need to be included in the installer:

  1. Morovia Barcode Font Files. The font files can be located at Fontware folder under Morovia directory.

  2. Morovia Crystal UFL. This file contains all the Morovia barcode functions and can be found under Morovia Font Tools directory (c:\program files\common files\MoroviaFontTools). Note that you must register the COM object in order to use it. The command line for registration is regsvr32 crufMorovia.dll.

  3. Crystal Runtime. The file name is U2lcom.dll. This file is required to work with COM UFLs.

Barcode Function Prototypes

The UFL provided implements all the functions listed in the Font Tools page. To save the space we will not list them in this page. They are very easy to use and remember. To conform to the Crystal Reports requirements, all UFL functions begin with MoroviaBarcode. For example, the function EAN13 listed in Font Tools page is available as MoroviaBarcodeEAN13. All functions take one single parameter which is the data to be encoded.

Manually Creating Barcode Strings for EAN-13 and UPC-A Barcodes

$
0
0

Manually Creating Barcode Strings for EAN-13 and UPC-A Barcodes

EAN-13 and UPC-A barcodes are widely used to identify retail items. The barcodes encode 13-digit and 12-digit number respectively. At the first glance, it is easy to create them. Unfortunately if you are using the font-based solution, it is not that easy as you may think. There are a couple of reasons:

  • To allow space efficiency, the same digit is coded with different patterns depending on its position in the barcode.

  • The same bar/space pattern may have or not have underlying text.

  • At last, font design requires every pattern to be represented by an unique character. You can not have one character representing multiple patterns.

As a matter of the complicity, we found that we have to use all printable ASCII characters, plus 10 extended characters to represent all bar/space patterns. This character set is far larger than the 10-digit numeric set. For every digit, there are five different encodings:

  • Left-hand Odd (LO)

  • Left-hand Even (LE)

  • Right-hand (R)

  • Supplement Odd (SO)

  • Supplement Even (SE)

In addition to the encodings, the unqiue printing requirement adds three variants to exsiting patterns:

  • With text below

  • Without text below

  • With text above

To allow user easily derive the encoding, we use a standard US-English keyboard [1] to map patterns to characters.

Figure 1. Character Mapping as laid out on a standard keyboard

Character Mapping as laid out on a standard keyboard

A. To print left-hand odd encodings without below text, use the first line of characters on a keyboard:

! @ # $ % ^ & * ( )

B. To print left-hand odd encodings with below text, use the second line of characters - that is, numbers 0-9:

1 2 3 4 5 6 7 8 9 0

C. To print left-hand even encodings without below text, use the third line of characters in captial case:

Q W E R T Y U I O P

D. To print left-hand even encodings with below text, we still use the third line of characters, however in lower case:

q w e r t y u i o p

E. Right-hand encodings do not have even/odd parity. To print right-hand encodings, use the fourth line. Captial letters print patterns without below text: [2]

A S D F G H J K L :

F. And lower case letters print patterns with underlying text:

a s d f g h j k l ;

G. Supplemental encodings use the last line, with capital letters printing odd encodings:

Z X C V B N M < >

H. And lower-case letters print even encodings:

z x c b n m , .

I. At last, these text-only symbols are printable with extended characters with values ranging from 0xc0 ~ 0xc9:

À Á Â Ã Ä Å Æ Ç È É

Because all printable ASCII characters are used up, we have to map these symbols to extended characters. On systems that a different character set other than Latin 1 is used, you will need to enter their corresponding characters. For example, in Eastern European languages (Windows code page 1250), character U+0154 (Latin character R with Acute) correspondes to value 0xc0.

Now that we have introduced character mappings, we proceed to explain how EAN-13 and UPC-A are encoded.

EAN-13 Encoding

An EAN-13 barcode encodes a 13-digit number. This number has a check digit at the end based on modulo 10 algorithm. Using Morovia UPC/EAN/Bookland fonts, a total number of 15 characters are needed to encode the whole barcode symbol, as depicted below:

Figure 2. Anatomy of an EAN-13 Barcode

Anatomy of an EAN-13 Barcode

The 16 characters are divided into six parts, as follows:

  1. Leading character, encoded with scheme I;

  2. Start character, represented by open square bracket symbol [;

  3. Left-hand encodings

  4. Central-guard character, represented by the virtical bar symbol |;

  5. Right-hand encodings

  6. Stop character, printable with close square bracket symbol ].

Leading Character

The leading character uses mapping scheme I. The character corresponding to this pattern is É, character value 0xc9. On Windows, this character can be entered by holding ALT key and using the numeric keyboard to type 201. Here 201 is the decimal value of 0xc9.

Start Character

The start character follows the leading character immediately. To enter this character, type [ (open square bracket).

Left-hand Encodings

The next 6 characters encode the first 7 digits using the left-hand encoding scheme. You might wonder how it can be done - here is the trick: the first digit is not converted into any characters; however its value determines the parity of next 6 digits. Remember that left-hand encodings have two parities - even and odd.

Table 1. Left-hand Parity Lookup Table

First Digit Second Digit Encoding 3rd 4th 5th 6th 7th
0 Left-hand Encoding, Odd Odd Odd Odd Odd Odd
1 Odd Even Odd Even Even
2 Odd Even Even Odd Even
3 Odd Even Even Even Odd
4 Even Odd Odd Even Even
5 Even Even Odd Odd Even
6 Even Even Even Odd Odd
7 Even Odd Even Odd Even
8 Even Odd Even Even Odd
9 Even Even Odd Even Odd

In our case, the first digit is 9, the encoding pattern for digit 2 to digit 7 should be OEEOEO according to the table above. Because all of them print human readable text below, the shcemes B and D are used. The left-hand odd encodings for digits 7 and 5 are themselves (7 and 5). The left-ahdn even encodings for digits 8, 0 and 3 are i, p and e respectively. Adding them all together we get the barcode string for this part: 7ip7e5.

Central Guard Character

The central guard character is printale using vertical bar |.

Right-hand Encodings

The right-hand encodings do not have parity. Since they all have text below, scheme F is used. Therefore, the barcode string for 200449 is haakds.

Stop Character

The stop character is mapped to close square bracket ].

Putting Altogether

Adding all the parts we derived so far, we get the complete barcode string for EAN-13 number 9780735200449 - É[7ip7e5|haakds]. Format this string with Morovia UPC/EAN/Bookland fonts you will get a complete barcode. Below shows the barcode with font typeface MRV UEBMA, 18 points:

UPC-A Encoding

A UPC-A barcode encodes 12 digits with the last digit served as check digit. The UPC-A encoding is very similiar to EAN-13, except the following differences:

  • UPC-A implies a country prefix 0. From Table 1, “Left-hand Parity Lookup Table”, it means that the first 6 digits are all encoded with odd parity.

  • The first digit is converted into bar/space patterns, however, it does not have below text. The text is instead placed outside the barcode.

  • The last digit is also converted into bar/space patterns, however, it does not have below text either and the text is placed at the end of the barcode.

A UPC-A barcode string consist of 17 character, and is divided into 6 parts:

Figure 3. Anatomy of a UPC-A Barcode

Anatomy of a UPC-A Barcode

Leading Character

The leading character uses mapping scheme I. To print the text-ony symbol for digit 0, use extended character À (character value 0xc0).

Start Character

The start character is mapped to open square bracket [, in the same way as in EAN-13.

Left-hand Encodings

This portion actually contains 6 characters, the same as in EAN-13. Since UPC-A numbers have an implicit country code of 0, the encoding schema are all odd according to Table 1, “Left-hand Parity Lookup Table”. However, note that the first digit is encoded without human readable text below, so it must be coded in scheme A. Therefore, the barcode string for the first part 021898 is )21898.

Central Gaurd Character

The central guard pattern is printable using the vertical bar symbol |.

Right-hand Encodings

The following 6 digits are encoded with right-hand encoding schema. The first 5 digits print their human readable text below and are coded in schema E. However, the last digit does not print text below, so it must be coded with schema F. Therefore, the barcode string for 623812 is hsdkaS.

Trailing Character

The last digit of a UPC-A number also has a text form which uses mapping scheme I. Digit 2 is mapped to Â.

Stop Character

The stop character is mapped to close square bracket ].

Putting Altogether

Adding all the parts we derived so far, we hae the complete barcode string for UPC-A number 021898623812 - À[021898|hsdkaS]Â. Format this string with a Morovia UPC/EAN/Bookland font you get a complete barcode. Below shows the barcode with font typeface MRV UEBMA, 18 points:


[1] Keyboards in other languages may have different layouts.

[2] When applying on punctuation symbols, the "capital" means that these characters are accessed by pressing the key while holding the Shift. For example, collon : is in the same class as upper case A while semicolon ; is in the same class as lower case a.

How to Manually Install True Type Fonts on Mac OS/X

$
0
0

How to Manually Install True Type Fonts on Mac OS/X

Since OS X Macintosh made a lot of changes to the operating system, including the fonts support. One of the greatest achievement is that Mac OS/X accepts Windows true type font files directly with no conversion needed. You still need a ZIP utility such as StuffIt expander™, since most of our fonts are packaged in ZIP files.

To Install Font

  1. Download and install StuffIt Expander if you do not have a ZIP utility installed in your system. StuffIt Expander is free and can be downloaded from http://www.stuffit.com/mac/. When download is complete, double click the icon in the desktop to install StuffIt Expander.

  2. Download the Fontware from Morovia web site. Unpack the ZIP by dragging downloaded ZIP into the StuffIt Expander icon. StuffIt generates another folder under which you can find a directory named Macintosh. Double click to open the Macintosh subfolder.

  3. At this stage, do not go to the Macintosh sub folder. Instead, double click the Windows subfolder to open it. All the true type files (Windows version) are found here.

  4. Drag the file you want to install to the Library/Fonts folder.

  5. The font is now ready to use. In some cases a reboot is needed to clear system cache.

To Remove Font

To remove the fonts installed, just drag and file from the System folder to the trash can.


How to Download, Select and Remove PCL Fonts

$
0
0

How to Download, Select and Remove PCL Fonts

System Requirements

  • A printer with a built-in PCL5 interpreter

  • A host computer that the printer is connect to via Widows share or LPR protocol

PCL stands for Printer Control Language, the language that a host computer used to communicate with the printer. The so-called raw printer data, or printer-friendly data, is expressed in printer control language.

Because communication happens directly between a host computer and a printer, the printer must have a built-in PCL interpreter. Some low-end models use host-based drivers instead (the host-based drivers convert PCL commands into raw printer commands). Those printers do not have the capability of processing PCL commands. Furthermore, the printer must be able to process PCL-5, which supports text and vector graphics data, instead of PCL-3, which only process raster bitmap data (PCL-3 is equipped in HP ink jet printers).

PCL-5 is widely supported by many manufacturers. All HP LaserJet printers support PCL-5. Most Xerox and Lexmark laser printers also fully support PCL-5.

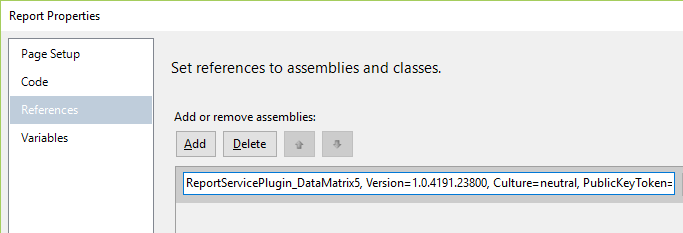
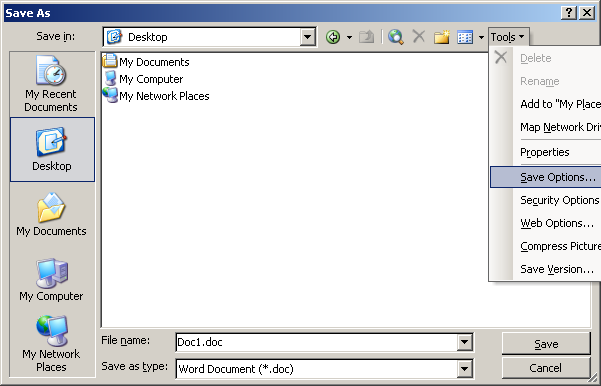
This article assumes that you use PCL commands to download and and remove soft fonts. Some high-end printers provide GUI interfaces to load/unload fonts. Refer to the manufacturer manual for information on how to use the GUI interface to install/remove the fonts.

Downloading PCL Font

The process of transferring PCL fonts from a host computer to the printer RAM is called Downloading. The process involves three steps: (1) assign font ID; (2) copy the font in binary form to the printer RAM; (3) Make the font permanent. The first two steps must happen in one session.

Once downloaded, a PCL font occupies a portion of user memory (RAM). The number of PCL fonts that can be stored in user memory is limited only by the available user memory.

Note: fonts installed in this way reside in printer's RAM area after being madepermanent. However, they cannot survive power outage because RAM is not a persistent storage. Some models allow you to add a hard disk to load the font at start-up. If this is not an option and you need absolute assurance of font existence, we recommend that you design your program in a way that it sends the font at the beginning of every job that requires the font.

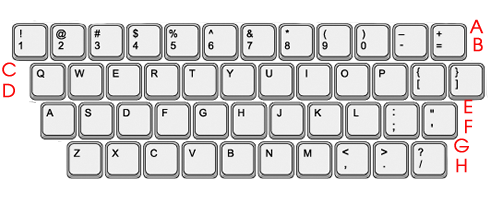
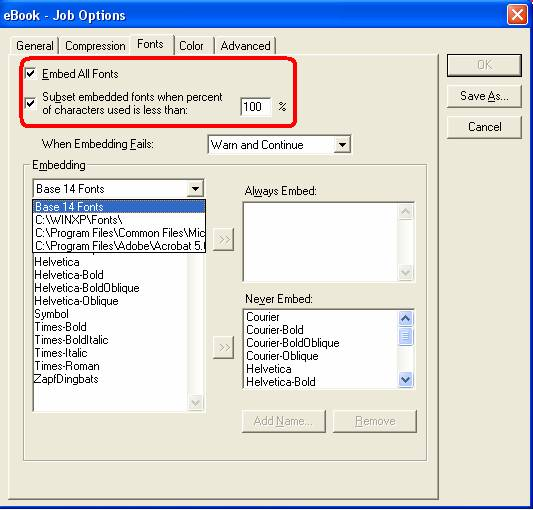
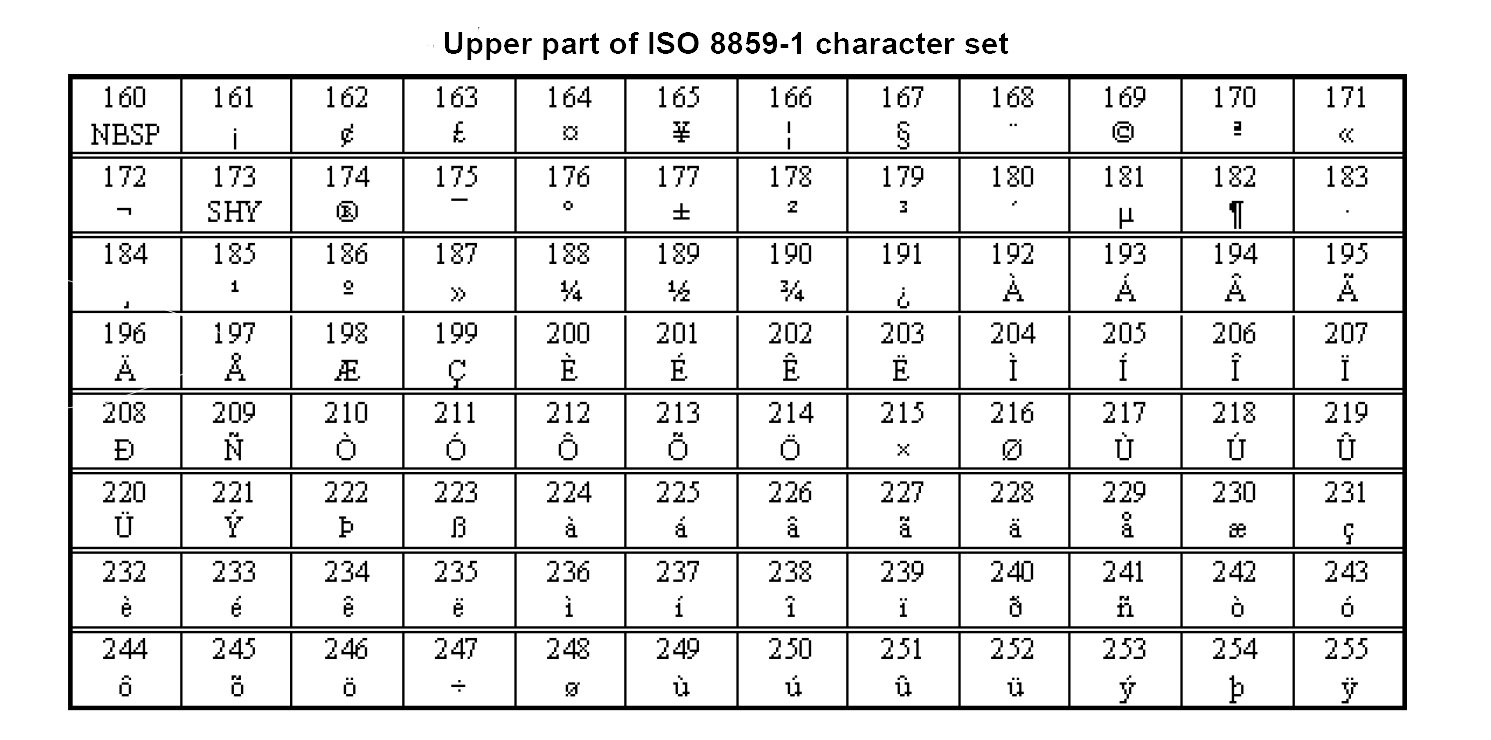
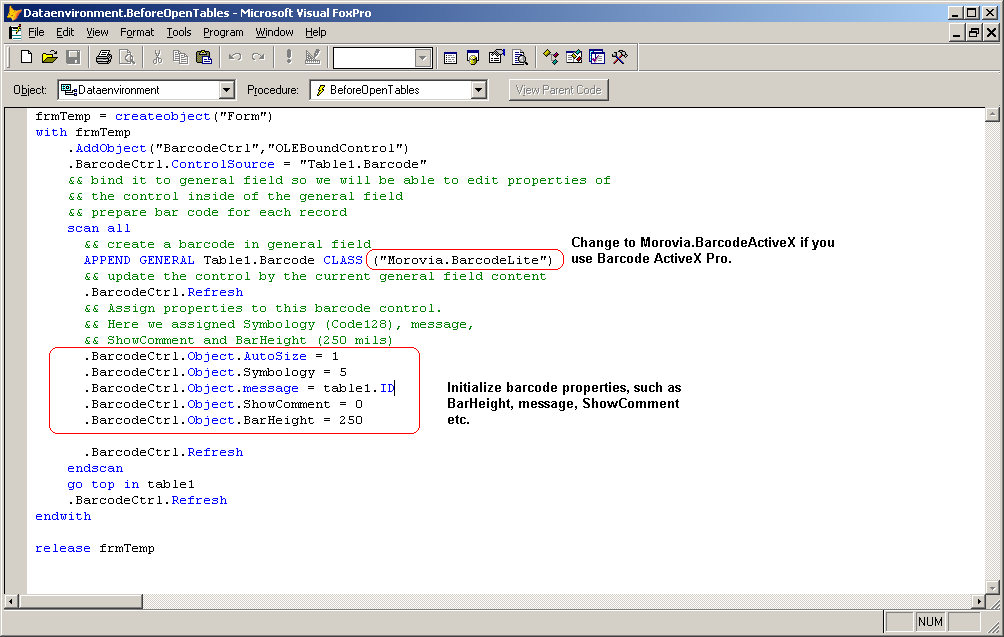
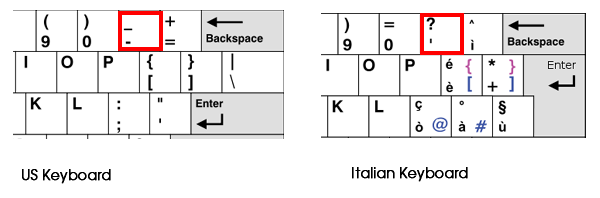
In the following illustrations we use <esc> to represent the ESC character. This character is not printable on Windows, but can be inputted using DOS EDIT. Open the text file in EDIT, press key P while holding the CTRL key, and then release both keys. EDIT displays the ESC character using a left arrow followed by an asterisk. In Notepad, this character is displayed as a small left arrow.

Font ID Command

Each soft font downloaded to the printer must have a unique Font ID. This Font ID identifies the font in subsequent commands such as font removal and font selection. The command has the format as:

<esc>*c#D

whereas#is the Font ID assigned.

For example, to specify a Font ID number 80, send

<esc>*c80D

Note

If a font with the same ID exists in the printer, the existing font will be overwritten.

Font Data

The Font Data must immediately follow the Font ID command. These two files can be merged into one and send altogether.

Make Permanent

Once downloaded, a font is designated as temporary. A temporary PCL font is removed from the user memory during a printer reset or a self-test is performed. To prevent the printer from deleting it during a printer reset you need to make it permanent.

The command is

<esc>*c5F

After the three steps are carried out, the font now resides in the printer and can be selected subsequently.

Checking Font Existence

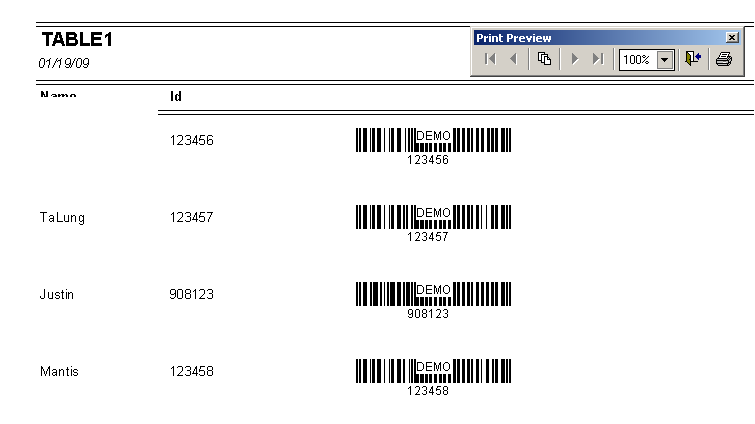
To verify that the font is residing in the printer, you can write some code which selects the font and prints a couple of lines of text. High end printer models usually have a LCD control panel that provides a way to print PCL font list. If a LCD panel is on the printer, you can do the following to print a PCL font list, and check the font name against the list:

  • Press theENTER/MENUkey on the control panel.

  • Use the>or<key to select Reports and pressENTER/MENU.

  • Use the>or<key to selectPCL Font Listand pressENTER/MENU. The printer exits the Menu settings and prints the list.

The image below is taken from the actual print out on a HP LaserJet 2300 model:

Selecting Font

There are two types of font selecting: the first selects the font using its Font ID. The first selects the font by its attributes, such as symbol set, point size and typeface family value. The second type is more appropriate for selecting scalable fonts.

For example, the following statement selects the font with Font ID 80:

<esc>(80X</esc>

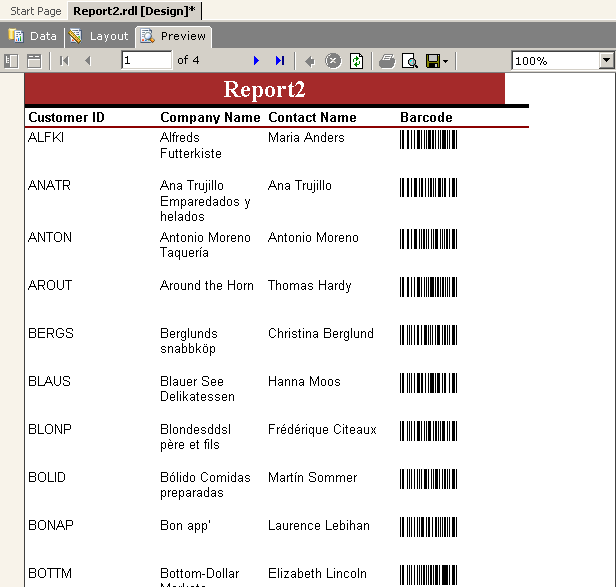
The statement below selects scalable font MRV Code39XSA at 16 points:

There are three parts in this statement. The first part, <esc>(0Y selects code 3 of 9 symbol set. The middle part <esc>(s16v sets font size to 16 points. Finally, the last part <esc>(s33221T selects the font with typeface family value 33221 (which corresponds to MRV Code39XSA. Typeface family value is the weakest requirement - however if multiple code 39 fonts are installed in one printer, it can be the only criteria to select the right font.

If MRV Code39XSA is not present in the printer, another code 39 font will be selected. If no code39 fonts are present, the default font is used. Therefore font selection can be used to verify if the font has been properly downloaded to the printer.

To switch back to the default font, using the command:

<esc>(3@

Removing Font

The remove font command takes the following form:

<esc>*c#d2F

Where # is the Font ID of the font to be removed. For example, the following command removes the font we just installed (Font ID 80):

<esc>*c80d2F

Putting Together

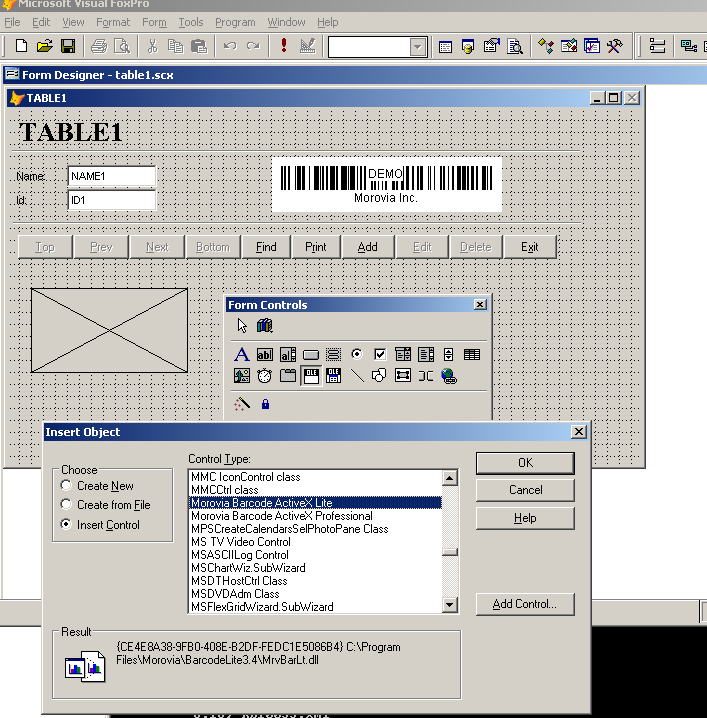
In this section we demonstrate downloading fonts with shell commands on Windows and Linux. The commands to use depend on the operating system, as well as how the printer is hooked up to the host computer.

Configuration 1: Peripheral Device

A printer can be connected to a host computer directly as a peripheral device. Under this configuration, this printer can be treated as a file with special names such as LPT1: or /dev/lpt1r. 
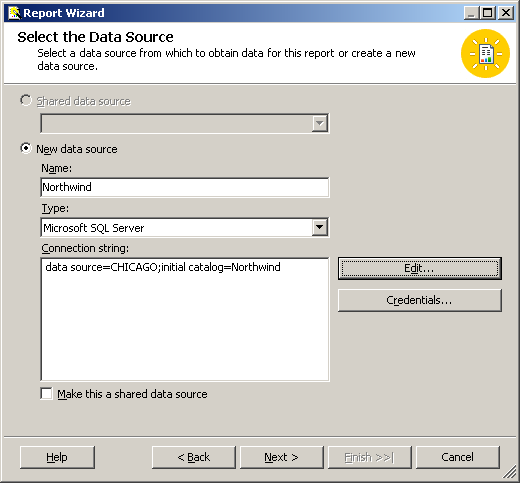
On Windows, a shared printer can be referenced using its share name, such as\\chicago\HPLaserJ(in this case, the printer is connected directly to a computer called chicago and shared through a Windows share name HPLaserJ).

Under this configuration, you can use copy/b on Windows and cat to send file to a printer:

c:\> copy /b C80D.txt +mrvcode39_4pitch.sfp +c5F.txt LPT1:
c:\> copy/b C80D.txt +mrvcode39_4pitch.sfp +c5F.txt  \\Chicago\HPLaserJ
#cat C80D.txt +mrvcode39_4pitch.sfp +c5F.txt  /dev/lpt1r

Configuration 2: Network Printer Server

When the printer is connected to a TCP/IP network directly, the best method is to send commands throughlpr command. A TCP/IP device may be identified with a full qualified DNS name, or an IP address. In our test lab, we assigned our network printer a fixed IP address 192.168.1.22, and we use this address in the examples below. Inlpr manual page, it is also referred as Printer Name.

Another name you will need is Queue Name. The queue names are names assigned to the processors in the print server. Many print servers and network printers hardcode their queue names. Some allow you to define your own queue. On HP JetDirect printer servers, the raw PCL queues are named as raw, raw1, raw2 and raw3. In this article we use rawas the queue name.

Note thatlpr command only accepts 1 file at a time. However, the step1 and step2 commands must be sent in one stream, otherwise the printer discards them altogether. As a result, you will need to merge those three files into one first. On Windows, you can use copy command:

copy /b C80D.txt +mrvcode39_4pitch.sfp +c5F.txt total.bin

On Linux/Unix platforms, use cat command:

cat c80D.txt mrvcode39_4pitch.sfp c5F.txt > total.bin

Now we can send these files (Windows):

lpr -S 192.168.1.22 -P raw -ol total.bin lpr -S 192.168.1.22 -P raw -ol data.txt

You need to replace the IP address, the queue name and the file name with the appropriate ones in your environment.

On Linux/UNIX platforms, things are more complicated. The configuration varies from platform to platform. Generally you need to set up the printer first. On RedHat Linux, this can be done using printtool. You assign a printer name (queue name) in the configuration, and you use this name in lpr command. Assume that the name is HPPrinter, the lpr command on RH Linux becomes:

lpr -P HPPrinter -o raw total.bin lpr -P HPPrinter -o raw data.txt

HOWTO: Embed True Type Fonts in Word/PDF documents

$
0
0

HOWTO: Embed True Type Fonts in Word/PDF documents

Occasionally you may need to send documents to a print shop for printing, or some one miles away for review. The documents contain Morovia barcode fonts or business fonts. With embedding font technology, a third party can view and print your document without prior installation of the fonts.

Note

Not all applications support embedding fonts. Embedding fonts also incur licensing issues. Our stance is that you are allowed to embed fonts into documents provided that the documents are supplied read-only (non-editable) and distributed to limited audience. Distribution over Internet requires developer licenses.

Microsoft Word and Adobe PDF formats support font embedding technology.

Microsoft Word

Consult your manual or help files for detailed information. The following description and screen capture is taken from Microsoft Word 2003.

To save a document with fonts embedded, select Save As... from File Menu, then click on Tools and select Options... to access the dialog show below.

In the Save dialog, check Embed true type fonts option.

Adobe Acrobat

Adobe PDF Writer (or Distiller in earlier versions) provides font embedding capabilities. When generating PDF files, select Embed Fonts from PDF Settings menu, and click on Fonts tab.

In the dialog, check Embed All Fonts, or select the font from the list.

ISO 8859-1 Character Set

$
0
0

ISO 8859-1 Character Set

Some symbologies (ex. Code 128, PDF417) define the default character set to apply is ISO 8859-1 when such information is not present in the barcode. ISO 8859-1 encodes what it refers to as Latin alphabet no. 1, consisting of 191 characters from the Latin script. This character-encoding scheme is used throughout The Americas, Western Europe, Oceania, and much of Africa. It is also commonly used in most standard romanizations of East-Asian languages.

Note

Although Windows 1252-1 encoding overlaps ISO8859-1, the two character sets are not the same. Windows 1252-1 uses code range 0x80~0x9f for additional printable characters, while they are reserved for control characters in ISO8859-1.

Figure 1. Upper Part of ISO8859-1 Character Set

Upper Part of ISO8859-1 Character Set

PRB: Fonts Not copied After Installing Full Version Over Trial Version

$
0
0

PRB: Fonts Not copied After Installing Full Version Over Trial Version

SYMPTOMS

You are installing the full version without first removing the trial version. The installation goes smoothly without any error messages. However, after the installation you discovered that no fonts are present in the product folder.

CAUSE

The case can happen when the fonts are in use by other application, such as Word or Crystal Reports. It is not reliable to rely upon Windows to tell if the font is in use. In many cases, Windows caches the font and allows the installation to go through. However, the trial version font is removed, but the new version can't be copied.

RESOLUTION

It is strongly recommended that you explicitly remove the trial version before installing the new version. At minimum, log off and log back to install the full version. In this way the fonts will be properly replaced because the existing font is not cached.

If you run into the problem, follow the steps below:

  1. Go to Control Panel and click on Add/Remove Programs.

  2. Remove the program just installed.

  3. Examine if any similar programs exist in the system. If so, remove them.

  4. Verify that the directory c:\program files\morovia\productname has been removed. If not, delete the directory. If you can't delete this directory, the font is still cached by Windows. Log off and try again.

  5. Re-run the installer to install the full version.

PRB: .Net Program that Calls Barcode ActiveX does not Run on 64-bit Windows

$
0
0

PRB: .Net Program that Calls Barcode ActiveX does not Run on 64-bit Windows

SYMPTOMS

A .Net program that calls Barcode ActiveX worked fine on 32-bit Windows. However, it does not start on Vista 64-bit, or throws an unhandled exception. The error code is REGDB_E_CLASSNOTREG.

The Barcode ActiveX control has been copied to the target machine and registered correctly.

CAUSE

By default, Visual Studio compiles .Net program under Any CPU setting, which generates x64 executable on a 64-bit PC and x86 executable on a 32-bit PC. However, Morovia Barcode ActiveX 3.x binary are x86 format only and can't be loaded into a x64 executable. Therefore, when running on x64 Windows, the .net run time throws an exception that complains that it can not locate Barcode ActiveX control.

RESOLUTION

When compiling programs that calls 32-bit DLLs, including COM objects, change the target CPU from Any CPU to x86 and rebuild the program.

To change the target CPU, perform the following steps (in Visual Studio 2005):

  1. Right click on the project and select Properties.

  2. click on Compile tab and click on Advanced Compile Options button.

  3. In the Target CPU combo box, change it to x86.

STATUS

This behavior is by design.

APPLIES TO

  • Morovia Barcode ActiveX 3.x

  • Microsoft Visual Studio 2005

  • Windows Vista 64-bit Business

Tutorial: Adding Barcode ActiveX to a Visual FoxPro Program

$
0
0

Tutorial: Adding Barcode ActiveX to a Visual FoxPro Program

This tutorial briefly explains how to add Barcode ActiveX (professional version and Lite version) in a Visual FoxPro program. The screenshots were taken from Visual FoxPro 9. However, they should apply in FoxPro 6 and above.

This example FoxPro application contains a small table called table1. This table has two fields: name and ID, which store the name and ID of employees. We would like to have barcodes for each employee in the report.

To Add Barcode ActiveX Control On a Form

In design mode, first make sure that Form Controls toolbar is visible with ViewForm Controls Toolbar (Alt-V+F). In the toolbar, click on ActiveX Control (Ole Control). Draw a rectangle and at the completion, the program pops up a list of controls:

Right click on Properties and you can modify properties there. You might want to set AutoSize to True so that the barcode drew on the screen reflect the real size, not the rectangle you just drew.

In order to display barcodes in reports, you need to do more. The next section explains how to add barcode in a report.

To Add Barcode ActiveX on a Report

In order for the barcode to appear on a report, you need to embed it in the table with type General. Open Table Designer, add a field called Barcode, and set the type to General.

In the design mode, first make sure that Report Controls Toolbar is visible with ViewReport Controls Toolbar (Alt-V+o). In the toolbar, click on Picture/OLE Bound Control and draw a rectangle.

In the subsequent dialog, select Control source type as General field name. In the control source box, enter table1.Barcode. This is the field name that we created in the first step. You may need to change it if you use a different table or field name.

Now we need to add code to initialize this control. Right click on the report, and select Data Environment. In the Data Environment windows, right click and select Code... to pop up the code window. Override BeforeOpenTables procedure in Object Dataenvironment.

The code is listed below for copy/paste:

frmTemp = createobject("Form")
with frmTemp
  .AddObject("BarcodeCtrl","OLEBoundControl")
  .BarcodeCtrl.ControlSource = "Table1.Barcode"
  && bind it to general field so we will be able to edit properties of
  && the control inside of the general field
  && prepare bar code for each record
  scan all
    && create a barcode in general field
    APPEND GENERAL Table1.Barcode CLASS ("Morovia.BarcodeLite")
    && update the control by the current general field content
    .BarcodeCtrl.Refresh
    && Assign properties to this barcode control.
    && Here we assigned Symbology (Code128), message,
    && ShowComment and BarHeight (250 mils)
    .BarcodeCtrl.Object.AutoSize = 1
    .BarcodeCtrl.Object.Symbology = 5
    .BarcodeCtrl.Object.message = table1.ID
    .BarcodeCtrl.Object.ShowComment = 0
    .BarcodeCtrl.Object.BarHeight = 250

    .BarcodeCtrl.Refresh
  endscan
  go top in table1
  .BarcodeCtrl.Refresh
endwith

release frmTemp 

If you are using Morovia Barcode ActiveX Professional, do not forget to change this line:

APPEND GENERAL Table1.Barcode CLASS ("Morovia.BarcodeLite")

to

APPEND GENERAL Table1.Barcode CLASS ("Morovia.BarcodeActiveX") 

Now save the work. click on Print Preview button to view the report. You may notice the "demo" text on the report because we created this example with trial version software. It won' appear if the full version software is installed.

An example project can be downloaded here. Note that this example uses Barcode ActiveX Lite. If you have Barcode ActiveX Professional installed instead, you need to change all references of Morovia.BarcodeLite to Morovia.BarcodeActiveX. As an alternative, you might download a trial copy of Barcode Lite so that you can run this example project on your computer.

Introduction to Downloading Files on Windows

$
0
0

Introduction to Downloading Files on Windows

This document provides general instructions for downloading and handling Windows files from Morovia Online Service. Note: some third party utilities are mentioned in this document. Morovia does not affiliate with any of these companies, nor provide technical support for using these third party utilities.

This document covers:

  • Downloading a file

  • Opening a PDF file

  • Opening a ZIP file

We also recommend you use the most recent version of Microsoft Internet Explorer or Mozilla FireFox when browsing Morovia web site. Both browsers are free to download the their web sites:

Downloading a file

To download files from the Adobe file library:

  1. Go to http://www.morovia.com, and click the Downloads link.

  2. Click the Download button. Most Web browsers will prompt you for a location to save the file. Choose a convenient location, such as your desktop. When saving the file, take note of the default filename so that you can locate the file after downloading it. After being downloading, most Web browsers will provide a progress indicator to let you know how long the download will take.

  3. When the file has finished downloading, locate the file and double-click it to open or install it.

Opening a PDF file

To view a PDF file, open it in an Acrobat viewer (e.g., Acrobat Reader). Acrobat Reader enables you to view, navigate, and print PDF files on several platforms. Acrobat Reader is available for free from all Adobe at http://www.adobe.com.

Opening a ZIP file

If your operating system is Windows XP or above, you do not need any third party utilities. Simply double click the zip file and choose Extract from the file menu. In other Windows platforms, you need to download a trial version of WinZip (http://www.winzip.com), WinRar(http://www.rarlab.com) or PKZip (http://www.pkware.com).


PRB: Text Disappeared From Bitmap Images Exported From Barcode Creator

$
0
0

PRB: Text Disappeared From Bitmap Images Exported From Barcode Creator

SYMPTOMS

You exported the barcode to one of the bitmap image formats (BMP, GIF, TIF and PNG). The bar code is OK, but the text is not present in the image created. The text is displayed correctly on the screen, and barcode printing is working just fine.

CAUSE

In order to accurately render the barcode image, Monterey Barcode Creator 3.x searches for a printer driver installed in the computer that matches the resolution specified. Once it finds a match, it loads the printer driver and uses the printer driver to rasterize the image.

Unfortunately, not all printer drivers are function as designed, and some printer drivers are badly written. Consequently it brings strange issues.

RESOLUTION

To work around the problem, you can either rasterize the image under screen resolution, or move the bad driver down to the chain so that a 'good' driver is used instead.

Rasterize Under Screen Resolution

To change the raster resolution, modify the property RasterImageResolution to 96.

If you are creating images for web, it is recommended to use 96 dpi, as it matches screen resolution.

Use a Good Driver

If you know that a printer driver works fine with Barcode Creator, you can move it up to the top in the search chain. In this way, the good driver is called instead of the bad one.

In our test, we did not found this issue on drivers from Microsoft, Adobe and HP. If you have one of these printer drivers, the chance is that it will perform well.

Barcode Creator calls Win32 API EnumeratePrinters to list the printer. It searches the local printer first, then remote printers. Windows sorts the list based on printer name (case insensitive) in descending alphabetical order. Therefore, printer with name HP Color LaserJet 3500 appears on top of Adobe PDF.

Another criteria in selecting the driver is the resolution requested. This is controlled by the property RasterImageResolution. By default it is 300 dpi. Any printer that has a resolution at integral times of 300 dpi is a candidate for the program. For example, the printer Adode PDF has a native resolution of 1200 dpi, it is a candidate because its resolution is compatible with 300.

In order for you to quickly locate a driver that matches your needs, we wrote a small console program called EnumPrinters. It displays all available printer names in the search order, followed by its native resolution.

To download the program, click here.

Move a Good Drive Up In the Chain

Once you located a good driver, the next thing is to move it up in the search chain. Change its name so that it appears on the top (for example, adding a letter Z at the beginning of the name).

Warning

Windows caches the search order of the printers. You must reboot the computer to make it effect.

APPLIES TO

  • Monterey Barcode Creator 3.x

PRB: Scanned Data is Incorrectly Displayed on Computer

$
0
0

PRB: Scanned Data is Incorrectly Displayed on Computer

SYMPTOMS

You connect barcode scanner to the computer with Italian keyboard layout through a keyboard wedge (such as USB interface). You encode 123-356-0940 in data matrix or Codabar, which is capable of encoding hyphen characters. You received the result as 123'356'0940.

CAUSE

Punctuation characters often have different virtual key codes among different locales. To enter punctuation characters correctly through a keyboard wedge interface, the scanner and the computer must use the same keyboard layout.

RESOLUTION

The Keyboard Country in your scanner must match the one on your computer with keyboard wedge interface. In this example case, you should configure Keyboard Country to Italy. This is usually done by scanning several barcodes in your scanner manual. For detailed information, see scanner manual for details.

STATUS

This behavior is by design.

MORE INFORMATION

Keyboard-wedge scanners emulate keyboard when reading barcodes. Four possible Windows messages are sent - WM_KEYDOWN, WM_KEYUP, WM_SYSKEYDOWN and WM_SYSKEYUP. Each message carries a Virtual Key Code that indicates which key is pressed. These messages are further processed through keyboard driver installed into WM_CHAR and WM_SYSCHAR messages, which are received by the application who owns the focus.

Generally speaking, each key on the keyboard has a virtual key code. However, not all printable ASCII values have their corresponding key codes. For example, Windows must rely on the status of Cap Locks and Shift to determine if KEY_A should be be mapped to capital case A or lower case a. Under this design, all keyboards have the same mechanics, and the differences are the key caps and corresponding keyboard drivers.

The Universal keys (i.e. always translated in the same way by keyboard drivers) are:

TAB, SPACE, 0-9, A-Z

and a number of function keys (F1-F12, Shift, Ctrl and so on).

Therefore, you may consider the fact when designing your application by restricting the character set of your data to digits and letters, if your application is going to be used in multiple locales.

Punctuation keys are often arranged differently among locales and therefore have different virtual key codes. Therefore to emulate these keys correctly the barcode scanners must be configured under the correct keyboard layout. If you use Italian keyboards, you must set the scanner's Keyboard Country to Italy in order to read punctuation letters correctly.

Figure 1. Keyboard Layout: U.S. vs Italian

Keyboard Layout: U.S. vs Italian

The figure above shows the right top portion of a standard US keyboard vs an Italian one. The minus key on a US keyboard corresponds to the single quote key on an Italian keyboard. A scanner configured as US keyboard emulation (which is default in most scanners) sends this key code to Windows upon reading barcode, and the Italian keyboard driver translates it into a single quote character.

To avoid these translation issues, you may consider using RSC-232 interface and read the data directly from the port, or through a wedge software that supports key translation.

APPLIES TO

  • All barcoding software

  • Microsoft Windows (All versions)

Adding PDF417 barcodes to Crystal Reports

$
0
0

Adding PDF417 barcodes to Crystal Reports

Introduction

Conceptually using two dimensional barcode fonts with Crystal Report is no different than using other fonts. In practice, there are a couple of issues need to work out. The major issue associated is the length limit imposed by Crystal Reports: no formula field can have more than 255 characters.

To add PDF417 barcodes to Crystal Report, you need to use Morovia 2D Fontware UFL. Native Crystal Reports formula is not supported.

Warning

The method described in this KB article applies on PDF417 Fontware version 3.x only. For version 4.0 and above, see PDF417 Fontware & Writer SDK 4 Reference Manual.

Installing UFL

We use Crystal Reports version 9 for tutorial. If you are working on an earlier version the steps outlined still apply. You are authorized to use the UFL provided by Morovia for free as long as you own a perpetual license. You are also allowed to distribute this UFL with your application with a developer license.

The PDF417 UFL component is included in every PDF417 Fontware package. There is no separate download of this UFL component. If you posses a valid license to any of 2D barcode font but can not locate this component, write to to request one.

The UFL functions are automatically available to Crystal Reports once the component is installed in your computer. The following functions are added to Crystal Reports:

Table 1. PDF417 UFL Functions

Function Description
MoroviaPDF417Encode Encode the data into an array of barcode string separated by line feed and carriage return between two adjacent lines.

Both function takes a parameter called trunk_no. Because Crystal Reports do not allow any formula fields having more than 255 characters, you need to call multiple times of encoding functions to receive different trunks of the result. The trunk_no starts from 1. Each trunk holds 200 characters.

Working with Crystal Reports

In the following tutorial we will start with a blank report. In the report we created several database fields. We want to be able to encode the data field of a table.

  1. First we switch to the design view. This can be done by choosing ViewDesign (Ctrl+D)

  2. Now choose ViewField Explorer to have Field Explorer appear at the right side of the work space.

  3. We are now ready to add the barcode field. Right click the Formula Fields to have the context menu pop up. Choose New...

  4. Give a name to this new filed. In our case we simply call it barcode_trunk1.

  5. Click on the Use Editor button. The Formula Editor pops up. Find Morovia barcode functions under the Additional Functions+Visual Basic 2000 Functions section. If you can not find such an item, most likely you probably need to check your computer to see why the file is missing. Restart Crystal Report and repeat the steps above.

  6. Select the the function MoroviaPDF417Encode, double click it to make it appear in the bottom panel. Move the cursor in between the parentheses. Put the data field you want to encode. In our case, we put {TestData.Data} because that filed is what we want to present in barcode form. Note that this field must be a text string. You can use Crystal Reports function ToText to convert other format into text string. Move the cursor to the next field, and type 1.

  7. Dismiss the Formula Editor and return to the Field Explorer dialog.

  8. Based on the calculation from the GUI Encoder, we know that it takes about 700 characters for the result. Thus we need four trunks to hold all the barcode string. We repeat the steps above and add another formula field barcode_trunk2. Repeat the steps above to add fields barcode_trunk3 and barcode_trunk4.

  9. Add a text field to the report. You can do this by selecting the text field from toolbar the dragging it to the report.

  10. Click on the text field to select it. From the Field Explorer, drag and drop the formula field, barcode_trunk1 into the text field.

  11. Drag and drop barcode_trunk2 to the same text field. Crystal Reports puts {@barcode_trunk1}{@barcode_trunk2}{@barcode_trunk3}{barcode_trunk4} into the text field.

  12. Format the text field with MRV PDF417S font. To do this you can right click the text field and select format text... menu item.

  13. Click on the Preview tab. The barcodes should appear. We have successfully build a report with barcode in minutes! During the encoding process, a dialog pops up to remind you that you are using a trial version of the software, and each symbol contain additional text "DEMO". This limitation will go away once you purchase the retail version.

Distributing UFL, Fonts with Your Report

Once you finish the report design, you can distribute your report application with Crystal run time files, barcode fonts and the UFL library.

License

First you must obtain a valid license from Morovia Corporation. You can either purchase single user license for every computer you are going to install; or purchase a Corporate license if you have a large install base within your organization. If you want to distribute outside your company, a developer license must be obtained.

File List

There are four runtime files needs to be included in the installer:

  • Morovia Barcode Font Files. The font files can be located at Fontware folder under c:\program files\morovia directory.

  • Morovia 2D Barcode Fontware Crystal UFL. This file contains all the 2D barcode font encoder for Crystal Reports. This file is named cruflMrv2DSurrogate.dll, which can be found in system32 folder under Windows directory. Note that you must register the COM object in order to use it. The command line for registration is regsvr32 cruflMrv2DSurrogate.dll.

  • Morovia PDF417 Font Encoder (ActiveX). This dll is normally located at c:\program files\morovia\PDF417Fontware. Since it is an ActiveX, you need to register in the client machine before using it.

  • Crystal Runtime. The file name is U2lcom.dll. This file is required to work with COM UFLs.

HOWTO: Adding Linear Barcodes in Microsoft Reporting Service 2000 and 2005

$
0
0

HOWTO: Adding Linear Barcodes in Microsoft Reporting Service 2000 and 2005

SUMMARY

This article demonstrates how to add linear barcodes (Code39, Code128, UPC_A etc.) to Microsoft Reporting Service. The method described here uses the font-based approach. Deployment is also included.

MORE INFORMATION

Microsoft SQL Server Reporting Service has gained momentum in enterprise reporting market. SQL Server Reporting service includes a Report Designer and Report Server. The Report Designer works with Visual Studio 2003 and 2005, allowing developers to quickly design and deploy a report.

Preparation

Before adding barcodes into report, you need perform several preparation tasks - compiling and installing custom assembly that provides the barcode functionality.

Compiling Custom Assembly

The source code is attached and can be downloaded here. The zip file includes two C# files, and a VS2003 project file. After building the project, you will get the DLL file named MoroviaFontRSPlugIn.dll. We recommend that you keep the file name intact.

Installing Custom Assembly

For Reporting Service 2000, copy the DLL into the following two directories:

  • Report Designer Folder: [Program Files]Microsoft SQL Server\80\Tools\Report Designer.

  • Deploy folder [Program Files]Microsoft SQL Server\MSSQL\Reporting Services\ReportServer\bin.

If you are using Reporting Service 2005, copy the DLL into the following directories:

  • Report Designer Folder: [Program Files]Microsoft Visual Studio 8\Common7\IDE\PrivateAssemblies.

  • Deploy folder [Program Files]Microsoft SQL Server\MSSQL\Reporting Services\ReportServer\bin.

If you have multiple SQL Server instances, you will have multiple MSSQL.n directories. Locate the one that the Reporting Service is installed under.

Warning

The computer must also have the fontware product installed. For example, if you are creating UPC-A barcodes, UPC/EAN/Bookland Fontware must be present in the same computer.

Understanding How Linear Barcode Fonts Work

Simply formatting the text with a barcode font won't produce a readable barcode. Most barcode formats require start and stop characters that tell the scanner where to start and stop. Additionally some barcode formats add checksum characters at the end to ensure the data integrity. To create a valid barcode, you need to call an encode function to get the barcode string (which adds start, stop and checksum characters), and format the latter with barcode font. You also need to determine which font and the font size for your application based on requirement.

Functions Included

The name of functions are the same as the ones in other packages, such as Windows DLL version. All functions take one input argument (the data to be encoded), and return the barcode string. Characters that can not be encoded with the symbology selected are removed. If a symbology requires fixed length of input, the excess will be truncated if the input's length exceeds the required length, or zeroes are appended to the end of the input if too short.

For more information about the encoder functions, see KB#10011.

Designing Report

In this tutorial, we add a column called barcode, which encodes the table column CustomerID in Code128 format. Function Code128Ex is used to make barcodes as short as possible.

  1. If you are adding barcodes into an existing project, skip to step 8. Now we start a new project. In Visual Studio, select FileNew Project. In the Project Types list box, click on Business Intelligence Projects. In the Templates box, select Report Project Wizard. Give the project a name and click OK.

  2. On the next screen, the Report Wizard asks for the data source. For simplicity we use the NorthWind database here, which is installed by default when installing SQL Server. You can type the connection string in the edit box directly, or you can have the wizard fill out for you by clicking the Edit... and select the appropriate choices from the Data Link Properties dialog followed.

    After you finish constructing the connection string, click Next.

  3. At this step, the Report Wizard asks for a query string which will be used to populate the data set in the report. You can enter something like Select * from Customers; or you can click on Edit... to pop up Query Builder to build the query. Make sure that you include CustomerID in the result set.

  4. Next, select the type of the report (tabular or matrix). Click Next.

  5. Now select the fields which will be displayed in the report. In the Available fields list box, use your mouse and CTRL key, select CustomerID, CompanyName and ContactName fields. Move them to the right.

  6. Follow the instructions to complete the wizard.

  7. On the left side, switch to Solution View. Expand Reports node to find the report just created. Double click on the report file name to bring it up to the right side. You will notice that three tabs appear on the right view, and the current position is at Layout tab. In the report, a field name is expressed something like Fields!CustomerID.Value.

  8. We now add a new column to hold the barcodes. Click on the Company header column once, the report responds by showing a header row on the top. Right click on the header row, and select Insert Column at the right. Give the new column a name Barcode.

  9. To define the value for the column, you need to tell that you are going to use the the assembly from Morovia. When the current view is the report, the Report menu is visible on top of Visual Studio. Select Report followed by Report Properties to bring up the Report Properties dialog.

  10. Click on the Reference tab. In the top list box, click on the ...button. Click on Browse button once to locate the assembly: MoroviaFontRSPlugIn.dll.

  11. Click on the General tab. Move the cursor to the Value edit box. Enter the following:

    =Morovia.SupportTools.ReportService.FontEncoder.Code128Ex(Fields!CustomerID.Value) 

    The last part of the definition is the function name.

  12. Click on the Font tab. From the font list, select MRV Code128S.

  13. Click on the Preview tab to view the report. The report should show as below:

  14. If you see a different shape rather than a rectangle, or just portions of a barcode, the width or the height of the column is too small for the barcode. Go back to the Layout view and use your mouse to make appropriate adjustments.

  15. After you are satisfied with the report, click BuildDeploy Solution, to deploy the solution to the Report Server. However, do read the deploy section in this article before you proceed with viewing report from your browser.

When there is an encoding error, for example, the data is too large to be encoded in the size specified, the function returns an error message in the place of the barcode. If an irregular barcode appears while there are enough spaces for the barcode display, most likely an error occurred. If that is the case, format the field with a text font and examine the message. If the size specified is too small, set a size that is capable of encoding the whole data, or set it to 0 for automatic size selection.

Changing Security Policy

The Reporting Service require any custom assembly defined in the security policy otherwise a run-time error will be thrown and all you get is #Error without any explanation. Follow the steps below to change security policy. Two security policy files are required to change:

  • RSPreviewPolicy.config. This policy file is used for DebugLocal preview in Visual Studio. This file is located in the Report Designer folder which is [Program Files]Microsoft SQL Server\80\Tools\Report Designer for RS2000 and [Program Files]Microsoft Visual Studio 8\Common7\IDE\PrivateAssemblies for RS2005.

  • rssrvpolicy.config, the policy file used for running Report Server. The file is located under [Program Files]Microsoft SQL Server\MSSQL\Reporting Services\ReportServer\bin directory.

Perform the following steps to add security policy required to run custom assembly:

  1. Open RSPreviewPolicy.config, and add the following content at the end (just before two ending CodeGroup tags):

    <CodeGroup class="FirstMatchCodeGroup"
      version="1"
      PermissionSetName="FullTrust"
      Name="MoroviaFontRSPlugIn.dll" Description="MoroviaFontRSPlugIn.dll">
      <IMembershipCondition class="UrlMembershipCondition" version="1"
         Url="C:\Program Files\Microsoft Visual Studio 8\Common7\IDE\PrivateAssemblies\MoroviaFontRSPlugIn.dll" />
    </CodeGroup>

    Note that on RS2000 the custom assembly is located in a different directory.

  2. Save the file. In Visual Studio, change the active configuration to DebugLocal and run the report. You should see the barcodes on the report. Examine the contents in the Output window.

    If you see message A first chance exception of type 'System.Security.SecurityException' occurred in mscorlib.dll, the security is not configured properly.

  3. After you have successfully run the report under DebugLocal configuration, publish the report to the Report Server. Open rssrvpolicy.config and add similar lines.

    Note that you may change the file path if it is located in a different location.

  4. Restart SQL Server Reporting Service and browse the report. You should see the barcodes on the report this time.

APPLIES TO

  • All Linear Barcode Fontware

  • Visual Studio 2003 / Reporting Service 2000

  • Visual Studio 2005 / Reporting Service 2005

Tutorial: Using Barcode ActiveX to Generate Barcodes in PHP Web Applications

$
0
0

Tutorial: Using Barcode ActiveX to Generate Barcodes in PHP Web Applications

This article explains how to create barcode images in PHP. The solution in this article requires PHP 5.0, Morovia Barcode ActiveX 3.3 (and above), and a web server (either IIS or Apache).

In HTML, you can't embed image files directly. You use HTML tag img with its attribute src set to the path of the image file, such as:

<img src="barcode.png" />

In normal case, the file referenced barcode.png must exist in the server. Because we want to create barcode dynamically, we need to come up another php script to create the barcode image dynamically and send out to the browser, like this:

<img src="getimage.php?id=1233456" />

The Barcode ActiveX software includes a classic ASP example that demonstrate creating image on the memory dynamically and sending to the browser. Unfortunately we have not found a similar solution in PHP. Right now, you have to store the image files on disk and load it at the later time. Utilizing disk files does have a performance advantage, as you can optimize calls to Barcode ActiveX (which is expensive). For example, you do not need to call Barcode ActiveX again on the same data. This article will show you how to use hash codes to achieve the optimization.

Checking PHP Configuration

Before you start, first make sure that the PHP is enabled on your application, and the version is 5.0 or above.

Creating a Directory to Store Image Files

Now create a directory to store image files. In this example, we use c:/Inetpub/WebAppData. This directory must be writable to the user that web server runs - in IIS it is usually IUSR_MACHINENAME.

Image Caching/Retrieving Strategy

Next we need to decide how to efficiently retrieve an image if it is already created. Morovia Barcode ActiveX provides several dozen options. In most cases you probably only need to change one or two per request. Let's assume that in your application all barcodes have the same properties except message (the data to be encoded). You can then use the value of message as the image file. A better solution is to create a hash value, and use this value as the file name, as you do not need to worry about escaping characters not allowed by the file system, and retrieval is likely faster.

$md5_string = md5($dataToEncode);
$filepath = "c:/inetpub/WebAppData" . "/" . $md5_string . ".png";
if (file_exists($filepath)) {
    /* do nothing */
} else {
    try {
        $encoder = new COM("Morovia.BarcodeActiveX");
        $encoder->Symbology = 5; /* Code 128 */
        $encoder->Message = $dataToEncode;
        ... /* set other default properties */
        $encoder->NarrowBarWidth = 20; /* X dimension */
        $encoder->BarHeight = 500;   /* 0.5 inch height */
        $encoder->ShowComment = false; /* disable comment */
        $encoder->TexAlignment  = 3; /* align human readable justify */
        $encoder->RasterImageResolution = 96;
        $encoder->ExportImage($filepath, 5); /* 5 - PNG image format */
    }
    catch (Exception $e) {
        $com_success = false;
        $error_msg = $e->getMessage();
    }
}

In the code above, we invoke Barcode ActiveX when we are unable to find an existing file that matches the request by searching the image directory based on the md5 hash value on the data to be encoded.

If you are using Barcode Lite, change the ProgID to Morovia.BarcodeLite.

Note that you must set Symbology first before changing Message property, as different barcode formats have different rules on its encoding character sets and default values.

Displaying Barcode Images

You can place the code in the front end script, or at the back end script. We choose front end script because if there is an error in barcode image creating process, we can handle it by not emitting the img tag, as the code below:

if ($com_success) {
  printf("<img src=\"getimage.php?file=%s.png\"/>\n", $md5_string);
} else {
  printf("<p style='color:red'>Error in getting image(%s).</p>\n",
            $error_msg);
}

If the barcode image requested was successfully created, the code emits IMG tag, which links to the back end script (we will talk about this soon). Otherwise it prints an error message.

Backend Script

In the backend, the getimage.php script searches the image directory, and if found, it reads the image data and sends to the browser.

/* getimage.php requires a parameter entered through GET. */

$file_string = $_GET['id'];
if (strlen($file_string) <= 0 ) {
    header ("HTTP/1.0 404 Not Found");
    return;
}

$image_dir = "c:/inetpub/WebAppData";

$filepath = $image_dir . "/" . $file_string;

if (file_exists($filepath)) {
    $fm = @fopen($filepath, "rb");
    if (!$fm) {
        header ("HTTP/1.0 505 Internal server error");
        return;
    }

    header("Content-Type: image/png");

    $begin = 0;
    $end   = filesize($filepath);

    fseek($fm, $begin, 0);
    $cur = $begin;

    while(!feof($fm) && $cur < $end && (connection_status()==0) ) {
        print fread($fm, min(1024*16, $end-$cur));
        $cur += 1024*16;
    }
} else {
    header ("HTTP/1.0 404 Not Found");
    return;
}
Viewing all 183 articles
Browse latest View live