Quantcast
Channel: Morovia Knowledge Base
Viewing all 183 articles
Browse latest View live

Printing 2D barcode using fonts from Visual Basic 6

$
0
0

Printing 2D barcode using fonts from Visual Basic 6

In Visual Basic you can "print" to more than just a physical printer. You can print to a form, a picture control, and also to any physical printer connected to your PC or to any shared network printer to which your PC is connected.

The following three statements print "test" to a form, a picture box, and a printer:

  form1.print "test"
  picture.print "test"
  printer.print "test"

Although three share the identical syntax, they produce very different results. Understanding the difference is important to produce high quality barcodes.

In the first prints, the drawing surface is the screen. A screen has a nominal resolution at 96 dpi, meaning that 1 pixel has a width of approximately 10 >mils [1]. A typical laser printer on the contrary has a resolution of 600 dpi, which translates to 1.67 mils per pixel. The difference means that you can achieve much high precision by printing directly to the printer.

In most occasions, the barcode images drawing on screen is for visual demonstration only. It is unnecessary for the barcode on the screen to be readable by a scanner.

Some customers mistakenly believe that the drawing is always scalable among different devices. They print the barcode to a picture box first, and then print the picture box out to the printer. Although vector graphics is scalable among devices, raster images do not. As a result, the barcodes produced have very low quality.

In summary, never print barcodes to screen first and transfer the resulted images later to the printer. Always print to the printer directly.

Printing Tips

We'll briefly review the printing features provided by the VB here. These samples show some of the most typical printing tasks you'd likely need.

Scale Mode

The ScaleMode determines the measurement unit you are going to use. You can set the scale mode to pixels, twips, inches, centimeters, points, character, and millimeters. Because of the resolution, the pixels scale mode is not portable among devices. 100 pixels appear much longer on a screen than on a printer.

EndDoc

When you print to a form or picture box, the image appears immediately. This is not the case for the printer. You must explicitly tell the printer where a page stops. Call EndDoc method when you finish all the drawings.

Printing at a specified location

If you'd like to print the barcode at a specified location, that is say 6 inch down and 1 inch over, you must set the currentx and currenty properties accordingly, as the code below:

  printer.scalemode = vbinches 
  printer.currentx = 1.0 
  printer.currenty = 6.0 

Print multiple lines

Visual Basic moves the printer cursor down a line after printing a line. Unfortunately the VB always moves the cursor to the left side of the printer. To have the lines started from the same currentx, you need to save this property and set it before calling Print:

  pos_x_save = printer.currentx 
  printer.print "line 1" 
  Printer.currentx = pos_x_save 
  printer.print "line 2" 
  printer.currentx = pos_x_save 

Parse the barcode string

The print method does not recognize line feed and carriage return characters. On the other side, the Datamatrix/PDF417 font encoder returns a single string separating lines with line feed and carriage return characters. You can specify the line separator with other strings, but the encoder always returns a single string. To get line by line you can use the split function provided by VB:

  Dim separator As String 
  Dim lines() As String 
 
  separator = vbCrLf 
  lines() = split(encoder_results, separator) 
  MsgBox "Total "  & UBound(lines) & "lines." 

Sample Code

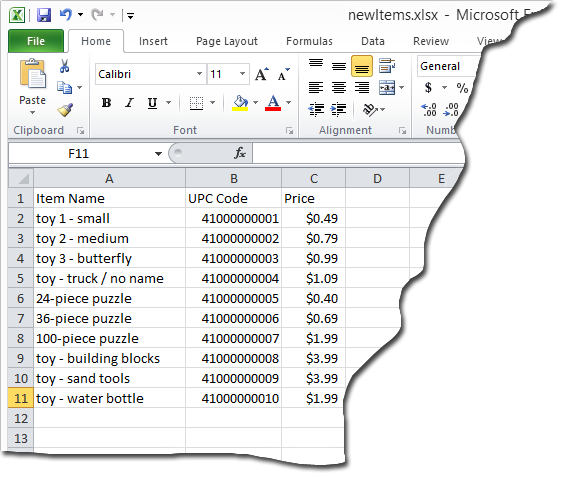
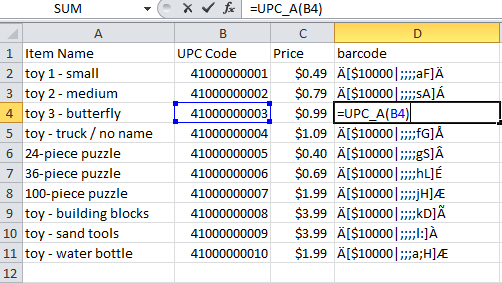
The code below prints a Data Matrix barcode at a point 1.5 inches to the left edge of the page, 3.0 inches from the top. The barcode string is stored in an edit control called BarcodeEdit. Replace BarcodeEdit.Text with your barcode string.

  Private Sub Command_Print_Barcode_Click()
  'To print the barcode, we recommend using the built-in Printer object
  'Do not print to a picture box and transfer it to printer. That results
  'in a low quality barcode.
 
  'You can change it to other values to adjust the barcode size.
  Printer.FontSize = 12
  Printer.FontName = "MRV DataMatrix"
 
  'We use inch as measurement unit here.
  Printer.ScaleMode = vbInches
 
  'We want to print the barcode at point (1.5 inch, 3 inch)
  'Note - printer usually has a margin 0.25" at four directions.
  'You may consider this fact when you set the printer cursor
  Dim StartX, StartY As Double
  StartX = 1.5
  StartY = 3#
  Printer.CurrentX = StartX
  Printer.CurrentY = StartY
 
  'The Priner always go back to the left edge of the page after executing
  'a print statement. Unless we print the barcode to the left ledge of the page,
  'we have to parse the barcode string into lines, and print them one by one.
  'Fortunately, VB provides a nice helper function for this purpose.
  Dim separator As String
  Dim lines() As String
  separator = vbCrLf
  lines() = Split(BarcodeEdit.Text, separator)
 
  'Now we do the actual print line by line
  Dim i As Integer
  For i = 0 To UBound(lines) - 1
   Printer.Print lines(i)
   'Note: the Printer always go back to the beginning of the next line
   'after executing Print. We need to set CurrentX every time after printing a line
   Printer.CurrentX = StartX
  Next
 
  'EndDoc must be called to actual print
  Printer.EndDoc
 
  End Sub


[1] 1 mil = 1/1000th inch.


Code 93 Specification

$
0
0

Code 93 Specification

Code 93 was designed to provide a higher density and data security enhancement to Code39. It is an alphanumeric, variable length symbology. code93 is used primarily by Canadian postal office to encode supplementary delivery information. Every symbol includes two check characters.

Code93 has a native character set of 26 upper case letters, 10 digits and 7 special characters:

A, B, C, D, E, F, G, H, I, J, K, L, M, N, O, P, Q, R, S, T, U, V, W, X, Y, Z 0, 1, 2, 3, 4, 5, 6, 7, 8, 9, -, ., *, $, /, +, %, SPACE.

Each Code93 character is divided into nine modules and always has three bars and three spaces. In this way comes the symbology name.

In addition to 43 characters, code93 defines 5 special characters: and . represents start/stop characters; while the last four circular symbols can be combined with other characters to unambiguously represent all 128 ASCII characters. The character encoding under the full ASCII mode is very similar to the one in extended Code39 except the component characters, $, %, / and + are replaced by 4 special characters and respectively.

In an open system, the minimum value of X dimension is 7.5 mils. the minimum bar height is 15 percent of the symbol length or 0.25 inches, whichever is greater. The starting and trailing quiet zone should be at least 0.25 inches.

Structure of a code 93 barcode

A typical code 93 barcode has the following structure:

  • A start character

  • Message encoded

  • First check character C

  • Second check character K

  • Stop Character

  • Termination bar

Check Digit Calculation

To calculate the check character "C" and "K", follow the following steps.

  • Take the value (0 through 47) of each character in the barcode (see the table below). The start and stop characters are not included in the checksum calculation.

  • Assign the weight for each character. The right-most character has a weight value of 1, the second to last 2 and so on. After 20, the sequence goes back to 1.

  • Multiply the character value with weight. Sum all the results.

  • Divide the result by 47 and get the remainder. Reverse look up the remainder to get the character. This is check character "C".

  • Append the "C" character at the end of the data, and repeat the step1 through step 4. This time the weight ranges from 1 to 15. The result is the character "K".

Table 1. Code93 Character Value Table

char value char value char value char value
0 0 A 10 N 23 - 36
1 1 B 11 O 24 . 37
2 2 C 12 P 25 SPACE 38
3 3 D 12 Q 26 $ 39
4 4 E 14 R 27 / 40
5 5 F 15 S 28 + 41
6 6 G 16 T 29 % 42
7 7 H 17 U 30 43
8 8 I 18 V 31 44
9 9 J 19 W 32 45
    K 20 X 33 46
    L 21 Y 34    
    M 22 Z 35    

PRB: Crystal Reports Crashes When Preview the Report

$
0
0

PRB: Crystal Reports Crashes When Preview the Report

SYMPTOMS

You created a report using one of UFLs. When you print preview the report, Crystal Reports designer crashed. On some computers, you receive an application error Unhandled win32 exception occurred in crw32.exe.

This error happens on certain versions of Crystal Reports and on computers with DEP (Data Execution Prevention) turned on.

CAUSE

Earlier versions of Crystal Reports (Crystal 9.0 and 8.5) contains bug in calling COM-based UFL. When the computer has DEP turned on, this bug triggers a DEP exception.

RESOLUTION

You can either upgrade the Crystal Reports to version 10 or above, or turn off the DEP protection for crw32.exe.

To turn off the DEP protection for crw32.exe, perform the following steps:

  1. Open System by clicking the Start button Picture of the Start button, clicking Control Panel, clicking System and Maintenance, and then clicking System.

  2. Click Advanced System Settings. Administrator permission required If you are prompted for an administrator password or confirmation, type the password or provide confirmation.

  3. Under Performance, click Settings.

  4. Click the Data Execution Prevention tab, and then click Turn on DEP for all programs and services except those I select.

  5. Click on Add. Browse to the Program Files folder, find the executable file crw32.exe (for example C:\Program Files (x86)\Crystal Decisions\Crystal Reports 9), and then click Open.

  6. Alternatively you can choose Turn on DEP for essential Windows programs and services. Under this setting, all executables except Windows programs are DEP excluded.

Note: the DEP is applied on process level. If your application or some other processes call Crystal Reports dll, you need to put the location of the process into the exclusion list. Alternatively, you can disable DEP on Windows level.

  1. Disable DEP at boot time: http://msdn.microsoft.com/en-us/library/ff542275.aspx. In a system admin console, type BCDEdit /set {current} nx AlwaysOff.

  2. Change BIOS settings to disable NX/xD bit.

Setting up LPR Printing on Windows 7/8

$
0
0

Setting up LPR Printing on Windows 7/8

On Windows 7 and 8, the default installation does not install lpr command. In order to test PCL fonts on a network printer, you need to install this command first. This article shows how.

Procedure 1. Procedure to install LPR command on Windows

  1. Click Start and choose Control Panel.

  2. Select Programs and Features.

  3. Select Turn Windows features on or off from the menu on the left.

  4. In the Windows Features on or off window that appears, click on the + sign in front of Print and Document Services and check the boxes for LPD Print Service and LPR Port Monitor. Click OK.

  5. Open command promp and enter lpr/?. You should see the following output, which indicates that the command is installed correctly.

    C:\Users\morovia>lpr /?
    
    Sends a print job to a network printer
    
    Usage: lpr -S server -P printer [-C class] [-J job] [-o option] [-x] [-d] filename
    
    Options:
          -S server    Name or ipaddress of the host providing lpd service
          -P printer   Name of the print queue
          -C class     Job classification for use on the burst page
          -J job       Job name to print on the burst page
          -o option    Indicates type of the file (by default assumes a text file)
                       Use "-o l" for binary (e.g. postscript) files
          -x           Compatibility with SunOS 4.1.x and prior
          -d           Send data file first     
            

INFO: Use LPR Command to Send PCL Font to Printer

$
0
0

INFO: Use LPR Command to Send PCL Font to Printer

Introduction

KB#10002 explains how to download PCL fonts using Copy command. To use this approach, the printer must be physically connected to a computer via a parallel or USB port and shared across a Windows network. Another widely deployed solution is to connect the printer to the LAN directly using a built-in network adapter or a print server adapter. This configuration allows computers running operating systems such as UNIX and Macintosh to print using LPD protocol.

Note

To use this approach, the printer must be connected to a TCP/IP network directly and has the PCL interpreter built in. Some printers rely on the host driver to interpret PCL commands and do not accept direct PCL stream. Check with your printer configuration to make sure that the PCL interpreter is built in the printer itself.

Before we go details about LPR command, it is necessary to explain two terms used in the LPR.

Printer Name

The printer name refers to the host name or the IP address of the printer device, depending on the network configuration. A TCP/IP device may be identified with a full qualified DNS name, or an IP address. In our test lab, we assign our network printer a fixed IP address 192.168.1.22, and we use this address in the examples below.

Queue Name

The queue names are names assigned to the "processors" in the print server. Most print servers and network printers have the queue names hardcoded. On HP JetDirect printer servers, the raw PCL queues are named as raw, raw1, raw2 and raw3. In the below example we use raw as the queue name. Replace this name with the one from your printer.

Tip

If you installed the printer driver on Windows, you can locate the LPR settings in the Port Settings dialog. To do this, first right click on the printer in Printer and Faxes list and select Properties. Select Ports tab and click on Configure Port... button. You can find Printer Name and Queue Name in the dialog followed.

Example Files

The example files are the same as the one in KB#10002. To download the files, visit KB#10002.

Steps to send fonts to the printer

As indicated in KB#10002, you perform three steps to send the font to a printer. The first command, Font ID, assigns a unique number to the font followed. After that you send the font binary file to the printer. The last step makes the font permanently reside in the RAM by sending the Make Font Permanent command.

Note

The font resides in the printer RAM; therefore it can not survive a power outage or power reset. To make sure that you always have the font available, repeat the font downloading steps at the beginning of each print job.

In our example, we store the data in three separate files: font-id.txt, code39ma.sfp, set-font.txt. We can use copy to send them in one stream. However, the LPR command does not support concatenating files. We need to combine these three files into one first and this can be done using the COPY command:

copy /b font-id.txt +code39ma.pcl +set-font.txt  total.bin 

After we combine the three files into one, we can then use lpr to send the font:

lpr -S 192.168.1.22 -P raw -o l total.bin

The option -o l is needed to send the file in binary format to the printer.[1]

After we complete sending the font, we can send the content.txt to the printer to print a test page:

lpr -S 192.168.1.22 -P raw -o l contents.txt

Note: the lpr option l is the l as in lucy, not digit 1.


[1] This option is available on Windows only.

Code 39 Specification

$
0
0

Code 39 Specification

Code 39 (also known as Code 3 of 9, Code 3/9, USS Code 39, Code three of nine, or USD-3) is the first alpha-numeric symbology developed to be used in non-retail environment. It is widely used to code alphanumeric information, such as the model number etc.

Code39 is capable of encoding 26 upper case letters, 10 digits and 7 special characters:

A, B, C, D, E, F, G, H, I, J, K, L, M, N, O, P, Q, R, S, T, U, V, W, X, Y, Z 0, 1, 2, 3, 4, 5, 6, 7, 8, 9 -, ., *, $, /, +, %, SPACE.

It Is called code 39 or three of nine because each character encoded is made up of 5 bars and 4 spaces for a total of 9 elements and 3 out of 9 element are always wide.

A complete code 39 barcode must include a start character * and a stop character *. In this way code 39 is self-checking.

The height of the bars must be at least 0.15 times of the symbol’s length or 0.25 inches, whichever is larger.

Code 39 is a discrete symbology. Two adjacent characters are separated by an inter-character gap. To have the good barcode quality, the width of the inter-character gap usually equals to the width of the narrowest element, called X.

Code39 requires a starting quiet zone with the minimum 10 times of X dimension or 0.10 inch whichever is greater. The same width requirement applies to the trailing quiet zone.

Variants

  • Code 39 Mod 43 — In applications that require very high level of accuracy a modulo 43 check sum digit is appended to the last character. Also known as HIBC and LOGMARS.

  • Code 39 Extended — this encoding variant allows all 128 ASCII characters to be encoded.

Code 39 Mod 43

In this variant, a check character is appended to the end of data encoded, using modulo 43 algorithm. To calculate the checksum digit, follow the steps below:

  1. Take the value (0 through 42) of each character in the barcode. The start and stop characters are not included in the checksum calculation.

  2. Sum the value of each of the values of each of the characters described in step 1.

  3. Divide the result from step 2 by 43.

  4. The remainder from the division in step 3 is the checksum character that will be appended to the data message before the stop character.

Table 1. Code39 Character Value Table

char value char value char value char value
0 0 A 10 N 23 - 36
1 1 B 11 O 24 . 37
2 2 C 12 P 25 SPACE 38
3 3 D 12 Q 26 $ 39
4 4 E 14 R 27 / 40
5 5 F 15 S 28 + 41
6 6 G 16 T 29 % 42
7 7 H 17 U 30    
8 8 I 18 V 31    
9 9 J 19 W 32    
    K 20 X 33    
    L 21 Y 34    
    M 22 Z 35    

Extended Code 39

The code 39 symbology can be extended to encode all 128 characters in the ASCII table. In the full ASCII mode, the symbols $ / % and + are used as precedence codes with the 26 letters as shown below. Since the same symbol now can be interpreted as one character in Extended Code 39 mode and two characters in Code 39 mode, the readers must be set to extended mode to read the data correctly. Extended Code39 is sometimes called Code39 Full ASCII.

Val ASCII Encoding   Val ASCII Encoding   Val ASCII Encoding   Val ASCII Encoding
0 NUL %U   32 [space] [space]   64 @ %V   96 ` %W
1 SOH $A   33 ! /A   65 A A   97 a +A
2 STX $B   34 " /B   66 B B   98 b +B
3 ETX $C   35 # /C   67 C C   99 c +C
4 EOT $D   36 $ /D   68 D D   100 d +D
5 ENQ $E   37 % /E   69 E E   101 e +E
6 ACK $F   38 & /F   70 F F   102 f +F
7 BEL $G   39 ' /G   71 G G   103 g +G
8 BS $H   40 ( /H   72 H H   104 h +H
9 HT $I   41 ) /I   73 I I   105 i +I
10 LF $J   42 * /J   74 J J   106 j +J
11 VT $K   43 + /K   75 K K   107 k +K
12 FF $L   44 , /L   76 L L   108 l +L
13 CR $M   45 - -   77 M M   109 m +M
14 SO $N   46 . .   78 N N   110 n +N
15 SI $O   47 / /O   79 O O   111 o +O
16 DLE $P   48 0 0   80 P P   112 p +P
17 DC1 $Q   49 1 1   81 Q Q   113 q +Q
18 DC2 $R   50 2 2   82 R R   114 r +R
19 DC3 $S   51 3 3   83 S S   115 s +S
20 DC4 $T   52 4 4   84 T T   116 t +T
21 NAK $U   53 5 5   85 U U   117 u +U
22 SYN $V   54 6 6   86 V V   118 v +V
23 ETB $W   55 7 7   87 W W   119 w +W
24 CAN $X   56 8 8   88 X X   120 x +X
25 EM $Y   57 9 9   89 Y Y   121 y +Y
26 SUB $Z   58 : /Z   90 Z Z   122 z +Z
27 ESC %A   59 ; %F   91 [ %K   123 { %P
28 FS %B   60 < %G   92 \ %L   124 | %Q
29 GS %C   61 = %H   93 ] %M   125 } %R
30 RS %D   62 > %I   94 ^ %N   126 ~ %S
31 US %E   63 ? %J   95 _ %O   127 DEL %T, %X, %Y, %Z

Structure of Code 39 Barcode

A typical code 39 barcode has the following structure:

  • A start character – the asterisk(*)

  • Message encoded

  • Optionally the check digit based on mod 43 algorithm.

  • A stop character – the second asterisk(*)

UPC-A Specification

$
0
0

UPC-A Specification

The UPC-A barcode is the most common and well-known symbology in the United States. You can find it on virtually every consumer goods in your local supermarket, as well as books, magazines, and newspapers. There are a number of UPC variants, such as UPC-E, UPC 2-digit Supplement, UPC 5-digit supplement.

UPC-A encodes 11 digits of numeric data along with a trailing check digit, for a total of 12 digits of barcode data.

Structure of a UPC number

A UPC-A number consists of four areas: (1) The number System; (2)The manufacturer code; (3) the product code; (4)The check digit. Normally the number system digit is printed to the left of the barcode, and the check digit to the right. The manufacturer and product codes are printed just below the barcode, separated by the guard bar.

  • Number System. The number system is the first digit in a UPC number. It identifies the type of the product. For example, if the barcode starts with digit 5, this barcode is a coupon code.

  • Manufacturer Code. The manufacturer code is assigned by the GS1 organization to each manufacturer or company which distributed goods that uses UPC-A barcode. You cand find your local GS1 organization at http://www.gs1.org.

    Traditionally manufacturer code was 5 digits in length. However the numbers have been running out and new customers are now getting 8-digit manufacturer code, meaning that there are only 100 item codes available to assign.

  • Product Code. The product code is assigned by the manufacturer. Because the combined length of manufacturer code and the product code is 10 digits, the number of product codes available depend on the length of manufacturer code.

  • Check Digit. The check digit is used to verify that the barcode is generated or scanned correctly. The check digit is calculated based on the rest of the barcode digits. Read the following section to learn how to calculate the check digit.

Table 1. Number System List

Number System (NS) Description
0 Regular Item
1 Regular Item
2 Reserved for local use (store/warehouse), for items sold by variable weight. Variable-weight items, such as meats and fresh fruits and vegetables, are assigned a UPC by the store, if they are packaged there
3 Drugs by National Drug Code number. Pharmaceuticals in the U.S. have the remainder of the UPC as their National Drug Code (NDC) number; though usually only over-the-counter drugs are scanned at point-of-sale, NDC-based UPCs are used on prescription drug packages and surgical products and, in this case, are commonly called UPN Codes.
4 Reserved for local use (store/warehouse), often for loyalty cards or store coupons.
5 Coupons.The last two digits determines the amount of the discount. See this link for the details. The remaining contain manufacturer and item information.
6 Regular Item
7 Regular Item
8 Regular Item
9 Coupons

Encoding

A UPC-A symbol can be divided into two halves, each consisting of six digits separated by a center guard bar pattern. The whole symbol is surrounded by two guard bar patterns. The same digit has different encoding depends whether it is in the left haf or in the right half. The encoding pattern for digits in the left halve always starts with a space while the one for digits in the right halve always start with a bar and ends with a space.

A UPC-A symbol has the following structure:

  1. Start guard bars, always with a pattern bar+space+bar.

  2. Left halve, six digits encoded using the encoding schema A or B;

  3. Center guard bars, with a pattern space+bar+space+bar+space.

  4. Right halve, six digits encoded using the encoding schema C.

  5. Stop guard bars, always with a pattern bar+space+bar.

Check Digit Calculation

UPC-A check digit is calculated using standard Mod10 method. Here outlines the steps to calculate UPC-A check digit:

  1. From the right to left, start with odd position, assign the odd/even position to each digit.

  2. Sum all digits in odd position and multiply the result by 3.

  3. Sum all digits in even position.

  4. Sum the results of step 3 and step 4.

  5. divide the result of step 4 by 10. The check digit is the number which adds the remainder to 10.

A web-based free utility to calculate UPC-A check digit is available at http://www.morovia.com/education/utility/upc-ean.asp.

MSI/Plessey Specification

$
0
0

MSI/Plessey Specification

MSI Data Corporation introduced MSI from the original Plessey Code. Therefore, MSI is also known as Modified Plessey. It is mainly used in retail business.

MSI/Plessey is a fixed-length, non-self-checking symbology.

Most applications still support MSI only for backward compatibility, because MSI/Plessey is based on Pulse-Width Modulation technology.

MSI requires start/stop characters. MSI is used to encode numeric data and check digit is required to add at the end of the data.

Variants

MSI is sometimes called Plessey Code or MSI/Plessey.

Structure of a MSI/Plessey symbol

A typical MSI/Plessey barcode has the following structure:

  • A start character

  • Message encoded

  • Check digit

  • A stop character

Check Digit Calculation

MSI uses one or two check digits, which may be calculated in a number of different ways. As such, it is really up to the software application to implement and check the check digit(s).

The most common method of calculating MSI check digit is Modulo 10.

To calculate the modulo 10 checksum digit, use the following steps:

  1. Create a new number using every other digit from the original code such that the right-most digit of the new number is the right-most digit of the old number. For example, in the barcode above the data we encoded was "8052". In this case, the "new number" is 02.

  2. Take the new number calculated in step 1 and multiply it by 2. In this case, 02 * 2 is 4.

  3. Add the digits of the value calculated in the previous step (4), and add it to the digits that were not used in step 1 to form the new number. In our example, this would be 4 + 8 + 5 = 17. The "4" comes from step 2, the 8 and 5 come from the "8052" and are the digits that weren't used to form the new number in step 1. If the result from step 2 were, for example, 123, then we'd add 1 + 2 + 3 = 6 (plus the digits that weren't used from step 1).

  4. Do a modulo 10 calculation on the result of step 3. In this case, 17 modulo 10 = 7.

  5. The check digit is the value which, added to the result in step 4, equals 10. In this case, we must add 3 to 7 to get 10-so the check digit is 3.


Codabar Specification

$
0
0

Codabar Specification

Codabar was developed in 1972 by Pitney Bowse, Inc. Codabar is a discreate, self-checking symbology. In Japan, it is called NW-7(Japanese standard JIS X0503)

Codabar has a character set of 16 letters: 0, 1, 2, 3, 4, 5, 6, 7, 8, 9, -, $, :, /, ., +.

Codabar has four start/stop characters we refer here as A, B, C and D.

Codabar is used in US blood banks, photo labs, and Fedex airbills.

The minimum value of X is 7.5 mils. The wide-to-narrow (N) ratio shall be between 2.0 and 3.0 and remains constant in the symbol, and N must exceed 2.2 if X is less than 20 mils. The minimum bar height is 15 percent of the symbol length or 0.25 inches, whichever is greater.

Variants

There is no check digit required for codabar, though some applications opt to append a check digit at the end of the message.

FedEx Airbills use a variant of codabar. A FedEx airbill number has the format of XXXX-XXXX-XXXY with an additional 4-digit format ID. The Y character is a check digit with the algorithm unknown to public. The first 12 digits is the track number. The barcode itself starts with start/stop character C and ends with start/stop character D.

Structure of a Codabar Barcode

A typical Codabar barcode has the following structure:

  • A start character from 4 choices: A, B, C and D.

  • Inter-character gap space

  • Encoded message

  • A stop character from 4 choices: A, B, C and D.

Check Digit Calculation

No check digit is used in Codabar symbology.

AIM Symbology Identifiers (SI)

$
0
0

AIM Symbology Identifiers (SI)

It is often desirable to record the barcode format along with the decoded message. In this way the application is able to produce the barcode at later stage. For this purpose AIM organization defined a standard on the use of symbology Identifier, a.k.a. SI. Not all barcode readers is capable of producing SIs. The SI prefix is a three character string:

]cm

where -

]

SI indicator

c

Symbology Identification

m

a Modifier character

Symbology Character

A Code39
B Telepen
C Code128
D Code One
E EAN/UPC
F Codabar
G Code93
H Code11
I ITF25
K Code16K
L PDF417
M MSI code
N Anker Code
O Codablock
P Plessey Code
R Straight 2 of 5 (two bar start/stop codes)
S Straight 2 of 5 (three bar start/stop codes)
T Code49
X Other Barcode
Z Non Barcode data

Modifier Character

The modifier character is determined by summing the option values of each symbology. For sum less than 9, use digit 0-9 respectively. If the sum is greater than 9, use A, B, C, D, E , F in the place of 10, 11, 12, 13, 14 and 15.

Code39 Option Values

0 No check character or Full ASCII
1 Reader has performed mod 43 check
2 Reader has performed mod 43 check and stripped the check character
4 Reader has performed Full ASCII conversion

Code 128 Option Values

0 Standard
1 Function code 1 in first character position
2 Function code 2 in second character position
4 Concatenation according to ISBT specification has been performed, and concatenated data follows.

Interleaved 2 of 5 Option Values

0 No check digit processing
1 Check digit has been checked
2 Check digit has been stripped

How Barcode Reader works

$
0
0

How Barcode Reader works

Bar coder readers decodes a bar code by scanning across the bar code and measuring the intensity of the light reflected back. The light variation is converted into digital signal. Due to barcode design, it does not matter you scan from the left to right or from the right to left.

A barcode reader contains two parts. The first part is the scanner that scans the image and coverts into digital representation (01111000). The second part is the decoder which combines the binary digital signals into a series of characters. The decoded information is sent to the computer via keyboard or serial interfaces.

Input Device

An input device accepts the reflected light and converts the optical reflection into digital/analog signals. There are two major methods used for input, laser beam and CCD (charge-coupled device). CCD scanners can be very small, but they have less depth of filed than laser scanners.

Decoders

A decoder decodes the symbol’s information and passes to the host computer or stores in the memory. A decodes accepts the digital signal from the input device, and converts the signals into bar and spaces. Then it quantify the element width, decode the signal based on the quantified widths. Finally, it performs some other check such as check characters. After the decoding process is complete, it transmit the data into host computer.

Decoders can be divided into two categories: on-line decoders and portable decoders. The on-line decoders use the power from AC adapter or from the computer, and the latter uses the battery.

Symbology Identifier (SI)

A barcode reader usually accepts inputs of multiple symbologies. For some applications it is usually nice to know what kind of symbology the data is encoded. For this reason AIM has published a standard of prefix to describe the symbology. The prefix takes the form ]cm, where:

]

the symbology identifier flag

c

the code identifier character

m

additional options

Currently the hardware support for this feature is somewhat limited. If your application does use this filed, you need to contact the vendor before your purchase the hardware.

Barcode Reader Interface

$
0
0

Barcode Reader Interface

Keyboard Wedge

This type of barcode reader is attached through the keyboard interface, the barcode reader sends data in scan codes (the codes used by IBM PC keyboards), exactly as you pressed the keys in the keyboard. It is called Wedge reader because they physically wedge between the keyboard and computer, as depicted the diagram below.

Since the barcode reader can use the power from the keyboard cable, no external power is needed. On the other side, this configuration is not designed for communication which has a distance more than 25 feet.

USB-based keyboard wedge

A special type of keyboard wedge barcode readers is the one using now-popular USB technology. It is similar to the keyboard wedge reader above, but uses the USB interface. No driver is needed too and the data is placed directly in the keyboard buffer. It is convenient to use with a notebook because the latter does not have an external keyboard.

Only Windows 98 or above platforms (including Windows ME, 2000 and XP) supports USB configuration. The OS treats the reader as a USB keyboard and automatically places the input in the keyboard buffer.

Keyboard Wedge interface is very simple to use. However, you must point the cursor to the correct input box and make sure that the cursor always stay in the right place before you press scan button. Theoretically a host computer can connect multiple barcode readers using this configuration, but the application has no knowledge about where the data comes from. Since the barcode reader receives power from the computer, this type of configuration does not need external power. The old application does not need to be modified to accommodate this configuration.

Serial Port

The barcode reader is connected to one of the serial ports of the computer. Software is needed to retrieve the information. It can be done in your application, or you place some programs coming with the barcode reader who simply reads the data and place them in the keyboard buffer. The communication takes the standard RS232 or RS432. An external power adapter is required for operation, and the distance can be as far as 250 feet. A host computer can connect as many barcode readers as the number of serial ports.

Windows provide a COM component called MSCOMM. Using this COM component your application retrieve the data from the OnComm handler. Win32 also provides serial communication APIs but this method requires advanced skills.

Portable Batch

This type of barcode reader has memory powered by battery. Usually it also has keyboard, LCD display and is programmable. The data is stored in the memory first and then dumped into the computer via a dock station. The data is usually transmitted in a comma-delimited text file format. The dock station also acts a recharge station.

RF Cordless

Under this configuration a RF base station is connected to the computer through keyboard wedge or serial interfaces. The barcode reader communicates with the base station via radio frequency. The transmission rates are in the 1200 to 4800 baud range. The battery usually lasts much longer than the portable batch readers.

INFO: VBA Example to Use Barcode Functions in MS Word

$
0
0

INFO: VBA Example to Use Barcode Functions in MS Word

SUMMARY

This article provides some information on converting selected text into barcodes using barcode fonts and VBA functions.

MORE INFORMATION

In the first part of this tutorial, we'll demonstrate how you can create a macro that turns the selected text into a UPC-A barcode. Later on, we'll show you how to associate the macro with a keyboard shortcut or menu item so that you can invoke the macro by pressing a key or selecting a menu item.

In order to use this tutorial, you need to have Microsoft Word 2000 and above and have the Macro enabled. You will also need Morovia UPC/EAN/Bookland Fontware. If you have other linear barcode fonts package, substitute the font name and encoder function with the ones in your package. You do not need the full version - the trial version will do just fine.

Macro can be in global scope or in document scope. If a macro is placed into normal.dot template, which is loaded into every Word document, it is visible to every document. Otherwise it resides on the specific document you are working on. In this tutorial we place macro into the document we are working on. If you need to reuse the macro frequently you may consider to place into normal.dot template to make it global.

Creating a Macro

  1. Open you document (referred as barcode.doc in this tutorial). Pop up Macros dialog with ToolsMacroMacros (ALT+F8). On Word 2007, first switch to Developer toolbar by clicking on Developer menu, then click on Macros tool button.

  2. In the Macros, enter name CreateUPCBarcode and choose Create.

  3. Now Visual Basic Window appears with the definition of subroutine CreateUPCBarcode. The VBA editor created the function and the body is left to fill out. Enter code in the body, to make the whole definition looks like below:

    Sub CreateUPCBarcode()
      Selection.Font.Name = "MRV UEBMA"
      Selection.Font.Size = 12
      Selection.TypeText (UPC_A(Selection.Text))
    End Sub

    The code first changes the font of selected text to MRV UEBMA, then calls function UPC_A to convert selected number into barcode string. After that, it overwrites the current selection with barcode string.

  4. Before we close the editor, we need to import Morovia VBA module because the macro calls an encoder function UPC_A which is defined in Morovia Font Tools module. Right click on the Project (barcode.doc) node and select Import File. Navigate to the folder c:\program files\common files\morovia\moroviafonttools and locate moroviafonttools.bas file. Click OK. Make sure that you only import this file once.

Applying Macro

After the macro is created, it can be applied manually. In the document, type our UPC number 01234567891 and highlight it. Pop up Macros dialog with ToolsMacroMacros (Alt+F8). Select CreateUPCBarcode and click on Run. The highlighted number becomes a UPC-A barcode.

Assigning Shortcut to Macro

After the macro is defined, you can assign the macro to a toolbar button, or a keyboard shortcut. Let's assign our new macro shortcut Ctrl+Alt+B.

  1. Right-click within the gray area at the top of Word –- inside the menu bar, within the toolbar (but not on a button), or in the gray, empty area to the right of the menus and toolbar buttons. Choose the Customize command (Alternative: ToolsCustomize).

  2. Choose the Command tab in the Customize dialog box. Choose the Keyboard... button at the bottom of the Customize dialog box.

  3. In the Save changes in pull-down menu at the bottom, choose the current document barcode.doc. In the Categories list, choose Macros, and in the right panel you'll find the CreateUPCBarcode macro.

  4. Click inside the Press new shortcut key text box. Press the shortcut key you'd like to use, such as Ctrl+Alt+B (this combination will appear in the text box). If the key combination hasn't been assigned to another command, Word displays Currently assigned to: [unassigned]. Click on the Assign button.

  5. The shortcut appears in the Current keys list. Dismiss all dialogs.

To undo the change, use the Tools/Customize command, then right-click the button and choose Delete. Alternatively, hold down the Alt key and drag the icon off the toolbar.

Assigning Menu Item to Macro

You can also assign a menu item to the new macro.

  1. Right-click within the gray area at the top of Word –- inside the menu bar, within the toolbar (but not on a button), or in the gray, empty area to the right of the menus and toolbar buttons. Choose the Customize command (Alternative: ToolsCustomize).

  2. Choose the Command tab in the Customize dialog box. In the Save in pull-down menu at the bottom, choose barcode.doc. In the Categories list, choose Macros, and in the right panel you'll find CreateUPCBarcode macro (it's listed as Project.Module1.CreateUPCBarcode).

  3. Drag the macro icon (it looks like a small organization chart or flowchart) to the Edit menu. Word opens the Edit menu.

  4. Move down the Edit menu. Your mouse cursor changes into a button, and as you move a dark vertical line appears in the menu at the position where you will be "dropping" (inserting) the new command. When you are satisfied with the location, release the mouse, dropping the line in the desired position (see Figure 5). The line changes to text: Word displays the Macro name. I chose to add the command between the Replace and the Go To commands.

  5. The Edit menu remains displayed. Right-click on your macro and change the name. I chose UPC-A &Barcode. This allows me to press Alt+E (to open the Edit menu), then press B to execute the macro.

  6. In the Customize dialog box, choose Close.

To undo the change, use the ToolsCustomize, then click on the menu item (to select it) and right-click your mouse and choose the Delete command.

Deleting Macro

When you save barcode.doc, your toolbar, menus, and keyboard shortcuts are saved with your document. Since we assigned the changes to barcode.doc, rather than normal.dot, the changes will be reflected only in barcode.doc. Open any other document (or create a new one) and your menus, toolbars, and keyboard shortcuts won't reflect the shortcut changes you made in barcode.doc.

APPLIES TO

  • Morovia Linear Barcode Fontware

  • Microsoft Word

Installing Fonts with command line script

$
0
0

Installing Fonts with command line script

Many large corporations need to deploy fonts to a large number of computers. However some administrator opt not to use the installer provided. Instead, they want to install the fonts only using a script.

The script below is written in VBScript. It looks into the shared directory \\media-server\FileFolder\fontsourcefolder\ for any files with .ttf extension. It then installs every file found, unless it is already existed in the local machine's font folder.

Option Explicit
Dim objShell, objFSO, wshShell
Dim strFontSourcePath, objFolder, objFont, objNameSpace, objFile

Set objShell = CreateObject("Shell.Application")
Set wshShell = CreateObject("WScript.Shell")
Set objFSO = createobject("Scripting.Filesystemobject")

Wscript.Echo "--------------------------------------"
Wscript.Echo " Install Fonts "
Wscript.Echo "--------------------------------------"
Wscript.Echo " "

Const EVENT_SUCCESS = 0
Const EVENT_CRITICAL = 1
Const EVENT_WARNING = 2
Const EVENT_INFO = 4 

strFontSourcePath = "\\media-server\FileFolder\fontsourcefolder\"

wshShell.LogEvent EVENT_INFO, "Installing font - invoke startup script "

If objFSO.FolderExists(strFontSourcePath) Then

Set objNameSpace = objShell.Namespace(strFontSourcePath)
Set objFolder = objFSO.getFolder(strFontSourcePath)

For Each objFile In objFolder.files
 If LCase(right(objFile,4)) = ".ttf" Then
  If objFSO.FileExists(wshShell.SpecialFolders("Fonts") & "\" & objFile.Name) Then
   Wscript.Echo "Font already installed: " & objFile.Name
   wshShell.LogEvent EVENT_INFO, "Font already installed: " & objFile.Name
  Else
   Set objFont = objNameSpace.ParseName(objFile.Name)
   objFont.InvokeVerb("Install")
   Wscript.Echo "Successfully Installed Font: " & objFile.Name
   wshShell.LogEvent EVENT_SUCCESS, "Successfully Installed Font: " & objFile.Name
   Set objFont = Nothing
  End If
 End If
Next
Else
 Wscript.Echo "Font Source Path does not exists"
End If

To execute the script, open a command prompt and enter:

cscript <path-to-script>

Notes

  • This script requires administrator privilege. On Vista and above with UAC turned on, the UAC prompt will pop up. To eliminate it, open an Administrator console first, then execute the script.

  • It is possible to execute the script using GPO policy at computer start-up. You can find instruction at: Assign computer start up scripts. Note that the fonts location and script must be accessible by the computer account. Usually this can be done by adding Domain Computers account into the security/share permission list.

  • Race condition may exists for a computer start up script. For reliable execution, it is recommend to perform on an interactive console (after logged in).

Code 128 Specification

$
0
0

Code 128 Specification

Code 128 is a high-density alphanumeric symbology. Since it was introduced in early 1980s, it has been widely adopted by many industry applications. GS1 derives its retail carton tracking standard GS1-128 (previously known as UCC/EAN-128) based on Code 128 symbology.

Code 128 is capable of encoding all 256 single-byte characters. By default, values above 127 are interpreted as ISO8859-1 characters. It also encodes fours special "function codes" - FNC1, FNC2, FNC3 and FNC4.

Structure of a Code128 Barcode

A typical code 128 barcode has the following structure:

  • A start character

  • Message encoded

  • Check character

  • Stop Character

  • Termination bar (bar+space+bar)

Subtypes

Code 128 includes 107 symbols: 103 data symbols, 3 start codes, and 1 stop code. To represent all 128 ASCII values, there are three code sets (A, B, C), which can be mixed within a single barcode (by using codes 98 and 99 in code sets A and B, 100 in code sets A and C and 101 in code sets B and C to switch between them):

  • 128A (Code Set A) - ASCII characters 00 to 95 (0-9, A-Z and control codes), special characters, and FNC 1-4

  • 128B (Code Set B) - ASCII characters 32 to 127 (0-9, A-Z, a-z), special characters, and FNC 1-4

  • 128C (Code Set C) - 00-99 (encodes each two digits with one code) and FNC1

Start/stop and encoded data

Each character in the barcode symbol is composed of three bars and three spaces. (The stop adds an additional extra bar of length 2.) Each bar or space is 1, 2, 3 or 4 units wide, the sum of the widths of bars must be even, the sum of the widths of the spaces must be odd, and total 11 units per character. For instance, encoding the ASCII value 0 can be viewed as 10011101100, where a 1(One) is a bar and a 0 is a space. A combination which contains a single 1 would be the thinnest line in the bar code. A combination including three 1 (111) in sequence indicates a bar three times as thick as a single 1 bar.

Check Digit Calculation

Every Code 128 symbol requires a check character being placed between encoded data and stop character. The check character is derived from a modulo 103 calculation of the weighted sum of all characters. Here is the procedure to calculate the check character:

  1. Take the value (0 through 102) of each character in the message. This includes the start character, shift character, but excluding the stop character.

  2. Start with the first character of the data, assign the weight for each character. The first character has a weight of 1, the second character has a weight of 2.. and increment by 1. Note that the start character also has a weight of 1. stop character is excluded in the calculation.

  3. Multiply the character value with weight. Sum all the results.

  4. Divide the result by 103 and get the remainder. Look up the remainder in the table to get the check character.

  5. The stop character, and termination bar is appended after the check character.


PRB: EAN13 formula shows "Invalid Ref" Error in Excel 2010

$
0
0

PRB: EAN13 formula shows "Invalid Ref" Error in Excel 2010

SYMPTOMS

You imported Font Tools VBA module following the instructions at Tutorial: Using Barcode Fonts in Excel Spreadsheets. After you put formula =EAN13(E2) (here E2 is the reference to data cell), Excel gives #REF! error.

CAUSE

Excel 2010 increases the number of columns that it can address to 3-letter column names. As a result, names like EAN13 are treated as a cell reference: column EAN and row 13. The VBA function is never invoked.

RESOLUTION

There are two solutions to this name confliction issue.

  • Method I: Save the file in legacy Excel format (.xls), which is the format compatible with Excel 2003. The legacy format does not utilize 3-letter column names.

  • Method II: change the VBA function EAN13 to a different name such as EAN_13 so that it does not conflict with cell references; and update all formula definitions. This can be done by opening the VBA module in VBA Editor and performing a global search and replace.

Source Code Reference

If you takes the method II approach, you can copy the code below and replace EAN13 function in VBA Editor. To open VBA Editor, click on Developer tab and click on Visual Basic tool button. If you did not see the Developer tab, see http://www.barcodeschool.com/2011/01/display-developer-tab-in-word-20072010/.

Public Function EAN_13(inpara As String) As String
Dim i As Integer
Dim checkDigit As Integer
Dim charToEncode As String
Dim symbmod As String
Dim symset As String
Dim symPattern As String
Dim charSet As String
Dim strSupplement As String
Dim charPos As Integer

charSet = "0123456789|"
inpara = maskfilter(inpara, charSet)
charPos = InStr(1, inpara, "|", 0)

If charPos > 0 Then
    strSupplement = UPC25SUPP(Right(inpara, Len(inpara) - charPos))
    inpara = Left(inpara, charPos - 1)
End If
If Len(inpara) < 12 Then
    While Len(inpara) < 12
        inpara = inpara + "0"
    Wend
ElseIf Len(inpara) > 12 Then
    inpara = Left(inpara, 12)
End If

Select Case Mid(inpara, 1, 1)
Case 0: symbmod = "AAAAAA"
Case 1: symbmod = "AABABB"
Case 2: symbmod = "AABBAB"
Case 3: symbmod = "AABBBA"
Case 4: symbmod = "ABAABB"
Case 5: symbmod = "ABBAAB"
Case 6: symbmod = "ABBBAA"
Case 7: symbmod = "ABABAB"
Case 8: symbmod = "ABABBA"
Case 9: symbmod = "ABBABA"
End Select

EAN_13 = textOnly(Mid(inpara, 1, 1)) + "["

For i = 2 To 7
    symPattern = Mid(symbmod, i - 1, 1)
    If symPattern = "A" Then
        EAN_13 = EAN_13 + convertSetAText(Mid(inpara, i, 1))
    ElseIf symPattern = "B" Then
        EAN_13 = EAN_13 + convertSetBText(Mid(inpara, i, 1))
    End If
Next i
EAN_13 = EAN_13 + "|"
For i = 8 To 12
    EAN_13 = EAN_13 + convertSetCText(Mid(inpara, i, 1))
Next i
checkDigit = getUpcGeneralCheck(inpara)
EAN_13 = EAN_13 + convertSetCText(checkDigit) + "]"

If strSupplement <> "" Then
    EAN_13 = EAN_13 + " " + strSupplement
End If
End Function
            

APPLIES TO

  • UPC/EAN Fonts 3

  • Microsoft Excel 2010

Serial Shipping Container Code (SSCC-18)

$
0
0

Serial Shipping Container Code (SSCC-18)

The Serial Shipping Container Code (SSCC) is used throughout the supply chain as an entity identifier for item tracing and internal control. It is the only mandatory field on a GS1 logistics label.

SSCC contains 18 digits started with an extension digit and ended with a check digit. The check digit is calculated according to the GS1 mod10 algorithm (the same algorithm that calculates UPC-A/EAN-13 check digits). An online check digit calculator is provided here.

Figure 1. SSCC-18 number structure

SSCC-18 number structure

A SSCC number has the following structure:

  1. The first digit is extended digit and assigned by the company. For historical reasons 0 is used to indicate that the container is a case or carton.

  2. The next 16 digits are the manufacturer code, followed by the serial number of this container. The manufacturer code (or company code) is assigned by GS1 (formerly known as UCC/EAN organization). The serial number identifies this merchandise container and assigned by the manufacturer. The manufacturer should not reuse the serial number within a certain time frame, for example, 1 year.

    The company code normally comprises 7 or 8 digits. Therefore, the serial number can be 9 or 8 digits.

  3. The SSCC-18 check digit. Do not confuse it with Code128 check digit. The check digit is to ensure that the data is correctly entered. It is part of the data encoded into the barcode. A receiving system is required to validate this check digit, so you should get it correct at the first place.

For each carton/pallet tracked, a unique SSCC is required. An ASN (Advance Ship Notice) may contain multiple SSCCs.

Barcode

The SSCC is usually coded with GS1-128 symbology. The Application Identifier (AI) for this type of barcodes is 00. Below shows an example SSCC-18 barcode (created with Monterey Barcode Creator 3.3).

Figure 2. An example SSCC-18 barcode

An example SSCC-18 barcode

The spaces in human readable text are not required but highly recommended because they help to identify the different parts of the number. In the example above, the 18 digits are divided into four parts:

  • 0 is the package type - a carton.

  • 0718908 is the manufacturer code assigned by GS1.

  • The following part is the serial number for this merchandise container (562723189).

  • At the end of this number is the check digit (6).

The barcode can also be created with Code128 Fontware. If you want to add SSCC-18 printing functionality into your program, consider Morovia Barcode ActiveX.

SSCC barcode is the most critical part in a GS1-compliant shipping container label. A shipping container label may contain other barcodes and text information, such as postal code, store # and PO number. You might want to read this article for more information on creating a shipping container label.

Check Digit Calculation

SSCC check digits are calculated the same way as UPC-A/EAN-13 check digits. Here are the steps to calculate SSCC-18 check digits:

  • From the right to left, start with odd position, assign the odd/even position to each digit.

  • Sum all digits in odd position and multiply the result by 3.

  • Sum all digits in even position.

  • Sum the results of step 3 and step 4.

  • Divide the result of step 4 by 10. The check digit is the number which adds the remainder to 10.

A web-based free utility to calculate SSCC check digit can be found here.

Tutorial: Creating barcode labels with Microsoft Word Mail Merge

$
0
0

Tutorial: Creating barcode labels with Microsoft Word Mail Merge

Using Morovia barcode fonts and included VBA module, you can easily create barcode labels. The linear font VBA module provides encoding functions for the following barcode formats: Code 39, UPC-A, UPC-E, EAN-13, EAN-8, Code 93, Code128, EAN-128, Codabar, POSTNET, Royal Mail, and Interleaved 2 of 5. VBA modules for other types of barcodes are included in the product packages.

This tutorial assumes that you are running a retail store and need to assign UPC-A codes for items that do not have barcode on the box. Generally speaking you can assign UPC codes that started with digit 4 for your own warehouse use. You can find more information at UPC-A Specification.

Assuming that the item list is store in an Excel spreadsheet, as below:

  1. Step 1. Prepare the data source. Follow the instructions in Tutorial: Using Barcode Fonts in Excel Spreadsheets to import linear barcode font VBA module to Excel.

  2. Step 2. In Microsoft Word, Open the Mailings tab and click on Start Mail MergeLabels...

  3. Step 3. Select the label format you'd like to use. Here we use Avery 5163 Shipping Labels.

  4. Step 4. click on Select RecipientsUse Existing List... Navigate to the spreadsheet we just created.

    click OK to select Sheet1 (the default).

  5. Step 5. click on Insert Merge Field to insert the fields that appear on the label. Layout them accordingly.

  6. Step 6. Highlight barcode field, and choose Font. Change the font to MRV UEBMA, 12 points. Click on Update Labels to transfer the settings to other labels.

  7. Step 7. Click on Preview results to view the merge results. You can print the labels out. If you changed values of some records, added or inserted records, the word document will reflect the changes.

Adding DataMatrix barcodes to Crystal Reports

$
0
0

Adding DataMatrix barcodes to Crystal Reports

Introduction

Conceptually using two dimensional barcode fonts with Crystal Report is no different than using other fonts. In practice, there are a couple of issues need to work out. The major issue associated is the length limit imposed by Crystal Reports: no formula field can have more than 255 characters.

To add DataMatrix barcodes to Crystal Report, you need to use Morovia 2D Fontware UFL. Native Crystal Reports formula is not supported.

Warning

The method described in this KB article applies on DataMatrix Fontware version 3.x only. For DataMatrix Font & Encoder 5, see DataMatrix Font & Encoder 5 Reference Manual.

Installing UFL

We use Crystal Reports version 9 for tutorial. If you are working on an earlier version the steps outlined still apply. You are authorized to use the UFL provided by Morovia for free as long as you own a perpetual license. You are also allowed to distribute this UFL with your application with a developer license.

The DataMatrix UFL component is included in every DataMatrix Fontware package. There is no separate download of this UFL component. If you posses a valid license to any of 2D barcode font but can not locate this component, write to to request one.

The UFL functions are automatically available to Crystal Reports once the component is installed in your computer. The following functions are added to Crystal Reports:

Table 1. DataMatrix UFL Functions

Function Description
MoroviaDataMatrixEncode Encode the data into an array of barcode string separated by line feed and carriage return between two adjacent lines.
MoroviaDataMatrixEncode2 Similiar with MoroviaDataMatrixEncode function, but offers more options. You can specify the target size and line separator with this function.

Both function takes a parameter called trunk_no. Because Crystal Reports do not allow any formula fields having more than 255 characters, you need to call multiple times of encoding functions to receive different trunks of the result. The trunk_no starts from 1. Each trunk holds 200 characters.

Working with Crystal Reports

In the following tutorial we will start with a blank report. In the report we created several database fields. We want to be able to encode the data field of a table.

  1. First we switch to the design view. This can be done by choosing ViewDesign (Ctrl+D)

  2. Now choose ViewField Explorer to have Field Explorer appear at the right side of the work space.

  3. We are now ready to add the barcode field. Right click the Formula Fields to have the context menu pop up. Choose New...

  4. Give a name to this new filed. In our case we simply call it barcode_trunk1.

  5. Click on the Use Editor button. The Formula Editor pops up. Find Morovia barcode functions under the Additional Functions+Visual Basic 2000 Functions section. If you can not find such an item, most likely you probably need to check your computer to see why the file is missing. Restart Crystal Report and repeat the steps above.

  6. Select the the function MoroviaDataMatrixEncode, double click it to make it appear in the bottom panel. Move the cursor in between the parentheses. Put the data field you want to encode. In our case, we put {TestData.Data} because that filed is what we want to present in barcode form. Note that this field must be a text string. You can use Crystal Reports function ToText to convert other format into text string. Move the cursor to the next field, and type 1.

  7. Dismiss the Formula Editor and return to the Field Explorer dialog.

  8. Based on the calculation from the GUI Encoder, we know that it takes about 700 characters for the result. Thus we need four trunks to hold all the barcode string. We repeat the steps above and add another formula field barcode_trunk2. Repeat the steps above to add fields barcode_trunk3 and barcode_trunk4.

  9. Add a text field to the report. You can do this by selecting the text field from toolbar the dragging it to the report.

  10. Click on the text field to select it. From the Field Explorer, drag and drop the formula field, barcode_trunk1 into the text field.

  11. Drag and drop barcode_trunk2 to the same text field. Crystal Reports puts {@barcode_trunk1}{@barcode_trunk2}{@barcode_trunk3}{barcode_trunk4} into the text field.

  12. Format the text field with MRV DataMatrix font. To do this you can right click the text field and select format text... menu item.

  13. Click on the Preview tab. The barcodes should appear. We have successfully build a report with barcode in minutes! During the encoding process, a dialog pops up to remind you that you are using a trial version of the software, and each symbol contain additional text "DEMO". This limitation will go away once you purchase the retail version.

Distributing UFL, Fonts with Your Report

Once you finish the report design, you can distribute your report application with Crystal run time files, barcode fonts and the UFL library.

License

First you must obtain a valid license from Morovia Corporation. You can either purchase single user license for every computer you are going to install; or purchase a Corporate license if you have a large install base within your organization. If you want to distribute outside your company, a developer license must be obtained.

File List

There are four runtime files needs to be included in the installer:

  • Morovia Barcode Font Files. The font files can be located at Fontware folder under c:\program files\morovia directory.

  • Morovia 2D Barcode Fontware Crystal UFL. This file contains all the 2D barcode font encoder for Crystal Reports. This file is named cruflMrv2DSurrogate.dll, which can be found in system32 folder under Windows directory. Note that you must register the COM object in order to use it. The command line for registration is regsvr32 cruflMrv2DSurrogate.dll.

  • Morovia DataMatrix Font Encoder (ActiveX). This dll is normally located at c:\program files\morovia\DataMatrixFontware. Since it is an ActiveX, you need to register in the client machine before using it.

  • Crystal Runtime. The file name is U2lcom.dll. This file is required to work with COM UFLs.

HOWTO: Export Image to an IStream Object

$
0
0

HOWTO: Export Image to an IStream Object

SUMMARY

BarImageExport.zip is a Visual C++ 6.0 sample that demonstrates how to export image to an IStream object.

For performance or other reasons sometimes it is desirable to export the barcode image to the memory only as a stream of data.

MORE INFORMATION

In the IDL, ExportImage is defined as:

[HRESULT ExportImage(VARIANT Destination, 
    ImageFormatEnum ImageFormat);  

The interface function takes two parameters. The first one is a VARIANT and the second one is an interger indicating the image format. The first parameter can contain two types - if it is a string, the parameter contains the path to the destination file. If it holds an IUnknown pointer, it is treated as an IStream object.

This sample uses the following steps to export the barcode image:

  1. Calls CreateStreamOnHGlobal() to create a standard IStream object.

  2. Calls QueryInterface to retrieve the IUnknown pointer.

  3. ackages the IUnknown pointer into a VARIANT.

  4. Calls ExportImage to export the image into IStream object.

Code Hightlights

Creating Barcode Objects at Background

This step can be skipped if you create the Barcode ActiveX object in Visual Studio Form designer or other integrated programming environment.

//Create Morovia Barcode ActiveX object
CComPtr<IDispatch> spDisp;
HRESULT hr = spDisp.CoCreateInstance(L"Morovia.BarcodeActiveX");
if ( FAILED(hr) ) {
  cerr << _T("Failed to load Morovia Barcode ActiveX object.") << endl;
  cerr << _T("Please reinstall the ActiveX object using the installer provided")<< endl;
  cerr << _T("by Morovia Corporation.")<< endl;
  return -1;
}
cout << _T("Morovia Barcode ActiveX loaded succesfully.") << endl;  

Memory Stream

Create a standard memory IStream object and then retrieve its IUnknown interface.

CComPtr<IStream> spStream;
CreateStreamOnHGlobal(NULL, TRUE, &spStream);
CComPtr<IUnknown> spUnknown;
spStream->QueryInterface(&spUnknown); 

Exporting Image

HRESULT hr = _com_dispatch_method(spDisp, 1004, DISPATCH_METHOD, VT_EMPTY, 
(void*)(NULL), L"\x000D\x0003", spUnknown, 1); 

In this sample we use the IDispatch interface to invoke the function. If you have the IBarcode interface pointer, you may use IBarcode pointer which is simpler:

CComVariant streamVar( spUnknown);
CComQIPtr<IBarcode> spBarcode(spDisp);
spBarcode->ExportImage(streamVar, 1); 

The integer 1 indicates we ask for the JPEG format. For the list of image formats supported by the control, refer to the Barcode ActiveX Reference Manual.

REFERENCES

APPLIES TO

  • Morovia Barcode ActiveX 3

Viewing all 183 articles
Browse latest View live